
At home hair dye offers a convenient way to transform your look without a salon visit, delivering vibrant hair color and personalized style from the comfort of your own space. This guide explores everything you need to know about diy hair color, from choosing the best home hair dye kits to tips for scalp care and safe application. Whether you’re aiming for bold blonde shades, subtle root touch-ups, or using nourishing conditioner and toner for lasting results, discover expert advice, essential tools, and answers to your most pressing questions.
Featured Products
Best Overall • Best Value • Premium Option


Note: As an Amazon Associate I earn from qualifying purchases. Some of the links on this site are affiliate links — when you buy through those links, I may earn a small commission at no extra cost to you.
Choosing Hair Dye Formulas for Color and Scalp Care
Choosing the right at home hair dye matters for color and scalp care. The best formulas balance vibrant color, easy application, and minimal irritation. Options include permanent hair dye, temporary hair dye, and semi-permanent dye to suit different needs and hair dye solutions.
Some hair dye formulas focus on scalp health, using conditioner-based systems and gentle ingredients. These at home hair coloring products help reduce dryness or irritation. Dyeing hair at home requires understanding which formula fits your dye for hair goals. Next, explore Key Ingredients and Suitability for Different Hair Types.
Key Ingredients and Suitability for Different Hair Types
- Ammonia-free at home hair dye formulas are gentle for sensitive scalps and help preserve hair care routines.
- Cream-based diy hair color spreads evenly on curly or textured hair, supporting uniform color.
- Conditioner-enriched home hair dye kits add moisture for dry or damaged hair types.
- Natural hair dye options with plant-based ingredients are ideal for minimizing scalp irritation during home coloring.
Preparing Roots and Hairline with Barrier Cream Protection
Protecting your roots and hairline is key when using at home hair dye. Barrier cream helps prevent stains on the skin. It creates a shield between dye and sensitive areas. This step supports a clean, professional look for all diy hair color applications.
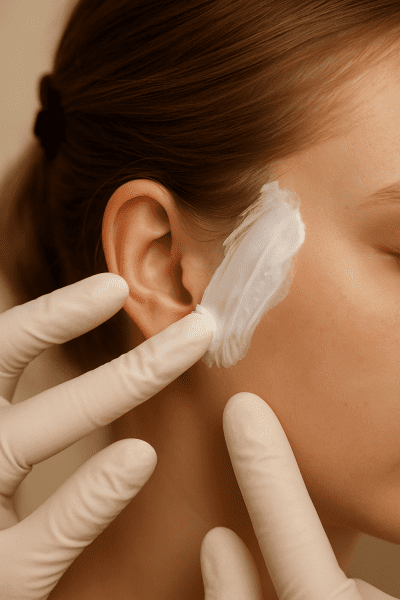
Use a thick conditioner, petroleum jelly, or a dedicated barrier cream to guard your skin. Apply along the hairline, ears, and neck before home coloring dye. This prevents stubborn dye marks and irritation. Next, learn the Steps for Effective Skin Shielding Before Dye Application to keep your at home hair coloring safe and mess-free.
Steps for Effective Skin Shielding Before Dye Application
- Section off hair with a comb to expose roots and ensure barrier cream covers the hairline.
- Wipe away any excess cream from the scalp before applying at home color for even dye absorption.
- Use a cotton swab to apply barrier cream around ears and neck for extra home hair dye protection.
- Let the barrier set for a minute before starting your diy hair color process for best scalp care.
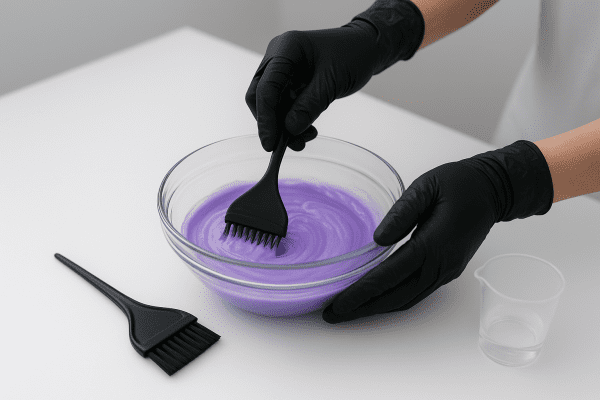
Mixing Powder and Liquid Dye for Consistent Coverage
Mixing powder and liquid dye is crucial for even hair dye coverage at home. Proper blending helps avoid patchy results. This process applies to many at home hair dye kits and diy hair color solutions. Consistent mixing ensures reliable color from root to tip.
Always combine powder and liquid in a clean bowl. Use a dedicated brush for your at home hair color. Add liquid slowly to prevent lumps. Stir until the mixture looks smooth, like thick cream. Correct mixing helps all hair dye solutions work better. Next, explore Measuring, Blending, and Achieving Smooth Dye Consistency for best results.
Measuring, Blending, and Achieving Smooth Dye Consistency
- Use a precise home kit hair dye scoop to measure powder for accurate dye solutions.
- Add liquid slowly to your mixing bowl, stirring with a brush until the cream is lump-free.
- Check hair dye consistency by lifting the brush; it should drip smoothly, not clump, for even coloring hair at home.
- Clean all tools, like combs and gloves, before blending at home hair dye to prevent contamination.
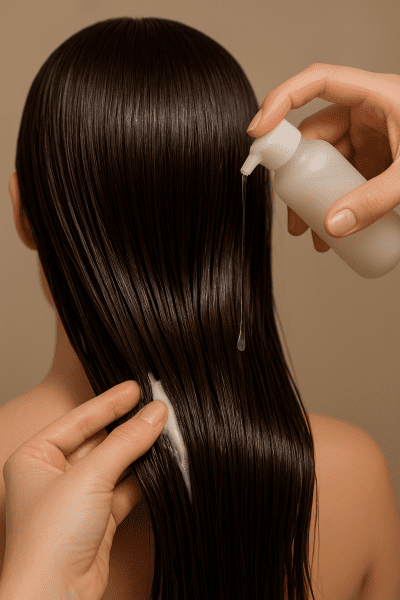
Applying Conditioner and Toner for Vibrant Hair Color
Conditioner and toner help achieve vibrant at home hair dye results. Conditioner adds moisture after coloring hair at home. Toner balances unwanted tones for a true dye for hair finish. These steps support diy hair color that looks refreshed and healthy.
Apply conditioner after rinsing out at home color to protect strands. Use toner to correct brassiness or yellow tones in blonde or silver hair dye. Both products fit into any home hair care routine. Next, discover tips for Enhancing Color Longevity and Neutralizing Unwanted Tones.
Enhancing Color Longevity and Neutralizing Unwanted Tones
- Use a sulfate-free shampoo after at home hair dye to help preserve color vibrancy and protect hair fibers.
- Apply a color-safe mask weekly to lock in moisture and extend the results of your home dye solutions.
- Rinse hair with cool water after using toner or conditioner to seal the cuticle and maintain salon-quality color.
- Limit heat styling on freshly dyed hair at home to prevent fading and keep your hairline looking fresh.
Managing Bleach Application for Blonde and Silver Shades
Bleaching is key for at home hair dye when creating blonde or silver shades. It lightens natural color before applying toner or dye for hair. Proper bleach application helps avoid patchiness and protects your hairline and scalp during home coloring.
Use a home kit hair dye bowl and brush for even bleach coverage. Section hair and protect roots with barrier cream. Monitor timing closely for safe color results. Consistent bleach mixing is important for diy hair color. Next, explore Home Bleaching Techniques for Even, Controlled Lightening.
Home Bleaching Techniques for Even, Controlled Lightening
- Apply bleach in horizontal sections to ensure consistent hair color at home.
- Use a tint brush to evenly saturate roots and fibers for best home hair treatment results.
- Monitor lightening with a timer and check strands frequently to prevent scalp irritation.
- Rinse with cool water and follow with a hydrating mask to protect newly lightened hair dye.
Using Brushes and Combs for Even Dye Distribution
Brushes and combs help spread at home hair dye evenly from roots to ends. These tools ensure hair color looks natural and consistent. Using the right brush or comb supports better results when coloring hair at home or applying diy hair color.
Sectioning hair with a comb allows dye for hair to reach every strand. Use a brush to apply home hair dye along the roots and through the fibers. Combs also help blend dye for at home use. Next, review Selecting and Handling Tools for Precise Color Placement for best technique.
Selecting and Handling Tools for Precise Color Placement
- Choose a wide-tooth comb for gentle home hair dye application on curly or textured fibers.
- Use a tint brush to target roots and hairline for accurate at home color placement.
- Clean brushes and combs with shampoo before each home hair care session to avoid color transfer.
- Select separate tools for bleach and toner to prevent unwanted mixing during diy hair color routines.
Minimizing Skin and Scalp Irritation During Home Treatments
Minimizing irritation is vital when using at home hair dye or diy hair color. Sensitive skin and scalp may react to some dye solutions for hair at home. Choosing gentle hair dye products and using proper home hair care steps reduces redness, itching, and discomfort.
Always patch test home dye before coloring hair at home. Use barrier cream along the hairline and roots to protect skin. Temporary hair dye or natural hair dye options may lower the risk of scalp irritation. Learn how to apply Preventive Measures and Aftercare for Sensitive Scalps for safer at home coloring.
Preventive Measures and Aftercare for Sensitive Scalps
- Choose a sulfate-free shampoo to maintain scalp comfort after home hair dye treatments.
- Apply a cooling mask post-coloring to soothe skin and protect hair fibers.
- Use home hair care products with aloe or oat extract to calm irritation from diy hair color.
- Limit harsh styling or heat tools after using at home hair color to help roots and scalp recover.
Maintaining Hair Health with Shampoo and Mask Solutions
Healthy hair matters when using at home hair dye or diy hair color. Shampoo and mask solutions help protect hair fibers and scalp. These home hair care products maintain color and reduce dryness from coloring hair at home.
Use a sulfate-free shampoo after applying hair dye at home. Apply a hydrating mask to restore moisture and shine. These home hair treatments keep color vibrant and support strong roots. Next, explore Nourishing Routines Before and After Hair Dyeing for complete care.
Nourishing Routines Before and After Hair Dyeing
- Deep condition with a hydrating mask before starting any at home hair coloring to strengthen hair fibers.
- Use a gentle, color-safe shampoo after dyeing hair at home to protect the hairline and prevent fading.
- Incorporate a weekly home hair treatment with nourishing oils to maintain scalp comfort and vibrant color.
- Avoid harsh styling or frequent heat after applying diy hair dye to support long-term hair care.
Addressing Color Correction and Root Touch-Up Techniques
Addressing color correction and root touch-up is essential for maintaining at home hair dye results. These techniques help fix uneven color, manage root regrowth, and keep your hair color looking fresh between full dye applications.
Quick fixes for dyeing hair at home include using a precision brush for roots and applying home hair treatment masks after color correction. Temporary hair dye sprays and powders also blend regrowth. Next, explore DIY Solutions for Fading, Brassiness, and Regrowth for more targeted at home color care.
DIY Solutions for Fading, Brassiness, and Regrowth
- Apply a purple shampoo to neutralize brassiness and refresh blonde hair color at home.
- Use a temporary root touch-up spray for quick coverage of regrowth between home hair dye sessions.
- Deep condition with a mask after diy hair color to revive faded tones and add shine.
- Blend a semi-permanent dye along roots for a seamless transition in your at home hair coloring routine.
Ensuring Safety and Cleanliness in Home Hair Dye Processes
Safe and clean at home hair dye routines protect your hair, scalp, and space. Using proper hair dye solutions and following simple precautions reduces risks. Clean areas and careful handling help prevent stains, irritation, and unwanted mess during your diy hair color sessions.
Always cover surfaces before starting at home hair coloring. Use gloves to avoid skin contact with liquid dye or bleach. Dispose of unused dye and empty hair dye kits properly. Keeping tools sanitized supports healthy hair care. Next, learn about Protective Gear, Cleanup, and Proper Product Disposal for every home coloring routine.
Protective Gear, Cleanup, and Proper Product Disposal
- Wear disposable gloves and a protective cape to shield skin and clothing during diy hair color sessions.
- Line your workspace with old towels or plastic to catch spills from home hair dye kits.
- Dispose of used hair dye kits, empty bottles, and gloves in accordance with local hair care and beauty product guidelines.
- Rinse brushes and combs with shampoo and warm water after at home hair coloring to prevent color residue buildup.
Final Thoughts:
At home hair dye offers a flexible, cost-effective way to refresh your look while prioritizing scalp care and hair health. By selecting the best hair dye at home and using key tools like conditioner and barrier cream, you can achieve salon-worthy results with confidence. Whether you choose a permanent hair dye or opt for a temporary hair dye solution, following proper preparation and aftercare routines ensures vibrant, lasting color. Ready to start your at home hair coloring journey? Explore trusted brands and home hair treatment options to find your perfect shade today.
Featured Products
Best Overall • Best Value • Premium Option
Note: As an Amazon Associate I earn from qualifying purchases. Some of the links on this site are affiliate links — when you buy through those links, I may earn a small commission at no extra cost to you.
Frequently Asked Questions (FAQs)
What steps should I take to prepare my hair and scalp before using at home hair dye?1
Answer: Clean your hair with gentle shampoo. Protect your hairline and roots with barrier cream. Section hair with a comb for easy at home hair dye application. Gather gloves, brush, and conditioner for home hair care. Avoid heavy styling products. Use a towel to shield your skin.
How can I choose the right at home hair dye formula for my hair type and desired color?2
Answer: Select an at home hair dye matching your color goal. Use cream for thick hair fibers. Choose ammonia-free for scalp and skin care. Pick permanent for lasting color. Try semi-permanent for gentle home coloring. Check ingredient lists for compatible hair dye solutions.
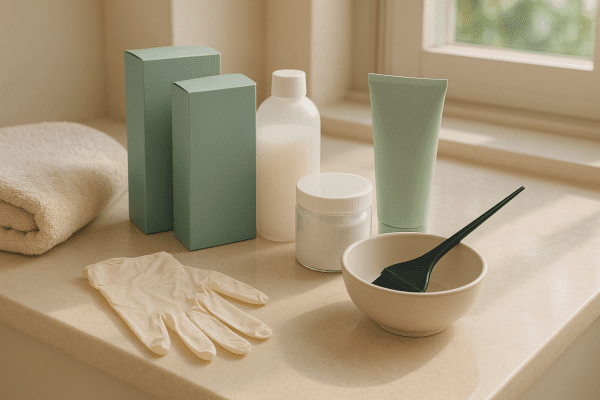
What tools and accessories are essential for even and mess-free at home hair dye application?3
Answer: Use gloves, a mixing bowl, and a tint brush. Section hair with combs for home dye. Apply barrier cream on hairline and roots. Have shampoo, conditioner, and towels ready. Keep your workspace clean with protective gear. These tools support easy at home hair dye routines.
How do I minimize skin and scalp irritation when dyeing my hair at home?4
Answer: Always patch test the at home hair dye. Use barrier cream on your hairline and skin. Choose sulfate-free shampoo for aftercare. Pick dye solutions with gentle ingredients. Apply a mask to soothe scalp. Avoid harsh styling and protect roots during home hair coloring.
What should I do if my at home hair dye results in uneven color or brassiness?5
Answer: Apply a toner to fix brassy tones. Use purple shampoo for blonde hair. Deep condition with a mask for faded color. Blend semi-permanent dye along roots. Section hair and reapply at home hair dye where needed. Maintain hairline and scalp care throughout correction.
How can I safely lighten my hair or achieve blonde shades at home?6
Answer: Use a home kit hair dye with bleach. Apply barrier cream on roots and hairline. Section hair for even bleach distribution. Monitor bleach timing with a timer. Rinse with cool water and use a hydrating mask. Follow with toner for true blonde color.
What aftercare routines help maintain the vibrancy and health of dyed hair?7
Answer: Wash with sulfate-free shampoo after at home hair dye. Use conditioner and hair mask for moisture. Limit heat styling and protect roots. Rinse with cool water to seal color. Apply nourishing oils and home hair treatments. Maintain scalp and hairline health with gentle products.
How often can I touch up my roots or refresh my color with at home hair dye?8
Answer: Touch up roots every four to six weeks. Use at home hair dye as needed for regrowth. Apply temporary dye or root spray between sessions. Deep condition fibers and protect scalp. Avoid over-processing your hairline and roots. Maintain regular home hair care for best results.
What is the main difference between formulas that fully cover regrowth and formulas that fade more softly?9
Answer: permanent hair color is usually the better fit when you want durable gray coverage and a more reliable permanent color result. By contrast, demi permanent and demi permanent color tend to fade more softly. If you want full regrowth blending, permanent hair is often the more direct choice. A second permanent hair color application is not always needed, but permanent hair is still the standard for stronger gray coverage. If you want flexibility, a hair color refresh with demi permanent can look softer while still supporting an even permanent color goal.
What should a complete at-home coloring set include before you begin?10
Answer: A solid color kit should include gloves, clear instructions, and enough formula for your length. A good hair color kit also supports hair care with conditioner or related care products. For shoppers comparing home hair color options, a second color kit detail to check is whether it simplifies cleanup and supports hair care after rinsing. That can make the setup feel easy, help color hair neatly from start to finish, and keep overall hair color planning simple when you want predictable color.
How can you refresh tone between major applications without starting over?11
Answer: For in-between maintenance, demi permanent color can refresh faded sections without a full redo. Semi permanent options are also useful for smaller touch ups and targeted root touch ups. This approach can maintain your hair color while giving your regular hair care routine a lighter break. It is also a simple touch point for keeping tone even between larger sessions, and another demi permanent pass can help tone look consistent.
What matters most when choosing a lighter target at home?12
Answer: If you are lifting dark hair, pick realistic shades and plan for more than one step. Reaching cool blonde often takes bleach first, then toning. To improve the odds of the perfect shade, choose a hair color kit that suits your starting level and follow processing closely for the best results. A finishing pass with demi permanent toner can help refine blonde pieces. For many readers, cool blonde is easier to maintain when the first blonde target is realistic.
How do you keep a fresh application looking polished for longer?13
Answer: Start with hair care products that support moisture and shine. Strong color care helps permanent hair color stay long lasting. It can also help gray coverage look smoother over time. For some shoppers, madison reed and another salon quality option may feel closer to salon expectations. Good aftercare lets the finish leave a softer appearance across the long run while protecting overall care. Consistent hair care can also keep permanent hair color looking more long lasting and support a polished permanent color result.
When is a targeted regrowth service the smarter choice?14
Answer: Choose root touch work when regrowth is the only area that needs attention. Focused root touch ups can maintain permanent hair or demi permanent hair color without reprocessing every section. They are also practical for quick touch ups when you want tidy coverage near the root line and a cleaner-looking shade match. For some routines, demi permanent hair can also soften the transition.
How should you compare featured brands before buying online?15
Answer: When comparing madison reed with another professional hair option, look at the formula, included tools, and overall salon quality promise. Some shoppers want ammonia free formulas, stronger gray coverage, or a guided kit with a more professional feel. It also helps to find natural-looking shades before you shop. That kind of comparison can feel more free and more aligned with salon goals.
What practical website details are worth reviewing before placing an order?16
Answer: Before you buy a new formula, review the site’s privacy policy and privacy rights so you understand its privacy terms. Then confirm whether the product is semi permanent or permanent, whether the home hair color option is ammonia free, and whether the store makes the order process clear. This can save time and help you compare permanent color, permanent hair, hair color, demi permanent color, color, results, gray, hair color hair, and overall care before you commit. It can also make the final choice feel more free and more clearly permanent when that is your goal.
Featured Products
Best Overall • Best Value • Premium Option
Note: As an Amazon Associate I earn from qualifying purchases. Some of the links on this site are affiliate links — when you buy through those links, I may earn a small commission at no extra cost to you.
Social Media Links
- jenatkinhair (Instagram)
- negin_mirsalehi (Instagram)
- jasmineraehairco (Facebook)
- theconfessionsofahairstylist (Facebook)
Last Updated on April 21, 2026 by msj484
DISCLAIMER (IMPORTANT): This information (including all text, images, audio, or other formats on FamilyHype.com) is not intended to be a substitute for informed professional advice, diagnosis, endorsement or treatment. You should not take any action or avoid taking action without consulting a qualified professional. Always seek the advice of your physician or other qualified health provider with any questions about medical conditions. Do not disregard professional medical advice or delay seeking advice or treatment because of something you have read here a FamilyHype.com.