
An acrylic nail set is your gateway to stunning, salon-quality nails right at home, whether you’re new to nail enhancement or seeking advanced nail art possibilities. This guide explores everything you need to know—from choosing the best acrylic nail kit and essential tools like brushes and primer, to mastering popular nail shapes such as almond and squoval. Discover expert tips, detailed application steps, and creative ideas using rhinestones and color gel to upgrade your manicure routine. Get ready to unlock professional-looking results with confidence.
Featured Products
Best Overall • Best Value • Premium Option


Note: As an Amazon Associate I earn from qualifying purchases. Some of the links on this site are affiliate links — when you buy through those links, I may earn a small commission at no extra cost to you.
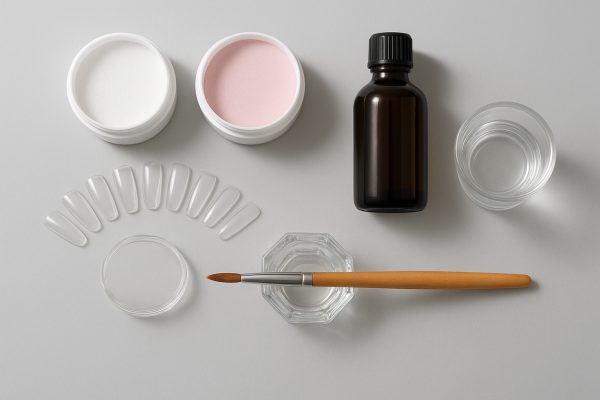
Understanding Acrylic Powder, Monomer Liquid, and Nail Tips
Acrylic powder, monomer liquid, and nail tips are the heart of any acrylic nail set. These essentials make it possible to sculpt durable, customizable nail enhancements. Many manicure sets use these components for extensions, overlays, or creative nail art.
Acrylic powder combines with monomer liquid to form a hard, smooth surface. Nail tips provide the base for artificial nail shapes. Using a brush, you blend powder and liquid, then apply over tips or natural nails. Next, let’s explore the key components found in a typical acrylic nail set.
Key components found in a typical acrylic nail set
- Primer and dehydrator help prep the nail surface for better acrylic adhesion and longer-lasting nail enhancements.
- Nail files and buffers shape the acrylic extensions and smooth the finished manicure.
- Acrylic nail tools like brushes and dappen dishes are essential for mixing powder and liquid during application.
- Nail accessories such as nail tips set, nail art decorations, or rhinestones add options for custom nail design.
Essential Brush, Primer, and Nail Tool Selection Tips
Choosing the right brush, primer, and nail tool is key for a smooth acrylic manicure. These essentials help you apply acrylic powder evenly and ensure strong adhesion. Proper tool selection also supports clean nail art designs and lasting results in any acrylic nail set.
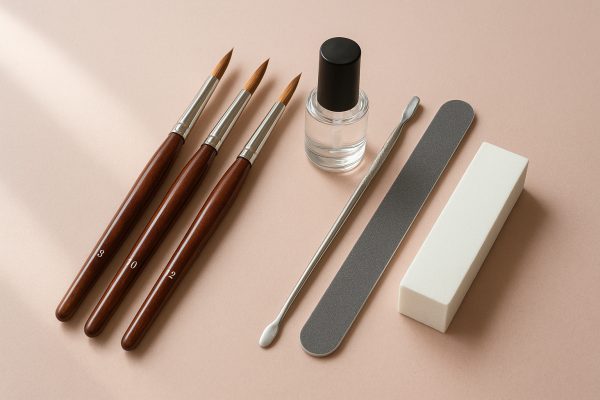
Look for a brush with firm bristles and a primer that improves acrylic adhesion. Nail tools like files and buffers help shape your acrylic nails. Prices for high-quality application tools range from $8–$25 each. Next, explore important Factors to consider when choosing essential application tools.
Factors to consider when choosing essential application tools
- Ensure your acrylic brush has the right shape and size for your preferred nail design and acrylic nail art.
- Select a primer compatible with both your acrylic powder and natural nail to prevent lifting.
- Choose nail tools made from durable materials that can withstand frequent acetone cleaning.
- Opt for nail files and buffers with appropriate grit to shape artificial nails without damaging the nail extension.
Proper Nail Preparation, Dehydrator Use, and Application Steps
Proper nail preparation ensures your acrylic nail set lasts longer. Using a dehydrator removes natural oils. This step helps acrylic powder and monomer stick. Clean nails prevent lifting and infection. Essential prep works for any acrylic manicure or nail enhancement.
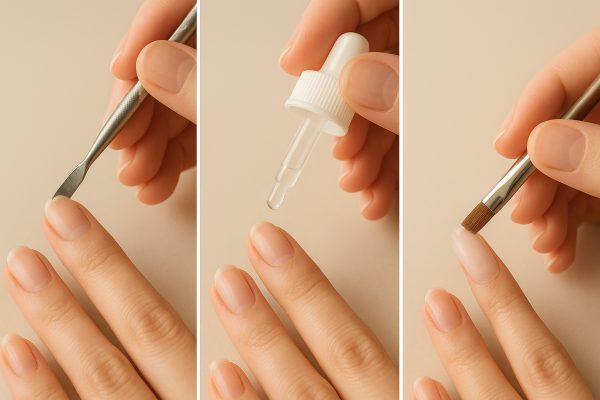
Start by cleaning nails and pushing back cuticles. Use a nail file to shape and gently buff. Apply dehydrator to remove moisture. A good primer improves adhesion for your acrylic nail art. To get flawless results, follow the step-by-step nail prep and acrylic application process.
Step-by-step nail prep and acrylic application process
- Apply a dehydrator to each nail to remove oil and improve acrylic nail adhesion.
- Use a primer on the natural nail surface before starting your acrylic manicure set.
- Dip the acrylic brush into monomer liquid, then into acrylic powder to form a bead for application.
- Shape the acrylic nail extensions with a nail file and finish with a topcoat for lasting nail enhancement.
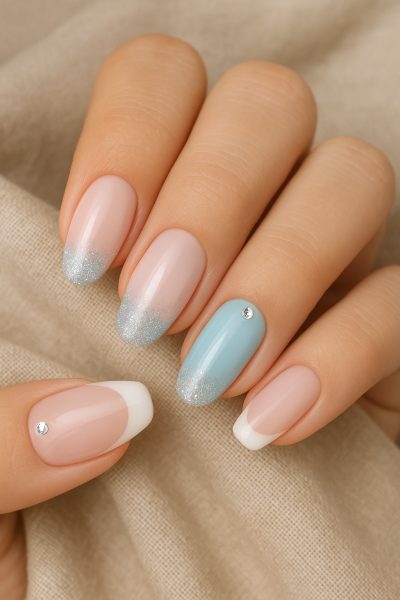
Achieving Popular Almond, Squoval, and French Nail Shapes
Almond, squoval, and French nail shapes are top choices for acrylic nail sets. Each style offers a unique look. Almond nails look elegant and elongate fingers. Squoval nails combine square and oval shapes. French styles feature a natural base with a white tip.
Achieving these shapes requires the right nail tools, careful filing, and practice with acrylic powder and nail tips. These shapes suit many manicure sets and nail enhancement designs. Many users choose these styles for versatility. Next, explore shaping techniques for trending acrylic nail styles for best results.
Shaping techniques for trending acrylic nail styles
- File artificial nails into almond or squoval shapes using a fine-grit nail tool for smooth edges.
- Sculpt acrylic powder precisely at the apex to enhance the strength of nail extensions.
- Use a brush and monomer to refine the French tip line for classic acrylic nail art.
- Shape false nails with buffers and finish with a topcoat for a polished manicure set.
Creating Durable Acrylic Nail Extensions and Overlays
Creating strong acrylic nail extensions and overlays starts with the right acrylic nail set. Acrylic powder and monomer liquid combine to form a durable surface. Nail tips or forms help shape artificial nails. These methods give you long-lasting nail enhancements and creative options for nail art.
Use a quality acrylic brush for precise application. Primer and dehydrator improve adhesion and prevent lifting. Nail files and buffers refine the nail extension for a smooth finish. Most acrylic manicure kits cost $18–$65 per set. For optimal results, follow the best practices for strong, long-lasting acrylic enhancements.
Best practices for strong, long-lasting acrylic enhancements
- Cap each acrylic nail extension with a protective topcoat to maximize durability and shine.
- Use a high-quality nail file to refine nail shapes like almond and squoval without weakening the acrylic.
- Maintain proper acrylic bead ratio with your brush and monomer liquid to prevent cracking or lifting.
- Regularly clean your nail tools and dappen dish to avoid contamination and ensure smooth acrylic powder application.
Nail Art Designs with Rhinestones, Color Gel, and Glitter
Acrylic nail sets make creative nail art easy. Rhinestones, color gel, and glitter add sparkle and dimension. These accessories upgrade any manicure set. You can design bold or subtle nail enhancements. Each element brings unique texture and shine to acrylic nails.
Use acrylic powder as a base for nail art. Apply color gel for vibrant polish effects. Add rhinestones or glitter for extra flair. Nail tools help place decorations with precision. Acrylic nail tips offer space for designs. Next, explore Creative decoration ideas using acrylic nail accessories for more inspiration.
Creative decoration ideas using acrylic nail accessories
- Arrange swarovski crystals in geometric patterns for a luxe accent on any acrylic nail design.
- Layer glitter over color gel to create sparkling ombré effects on almond or squoval nail shapes.
- Use nail art studs and pearls to highlight the apex of each nail extension for added dimension.
- Apply tiny flower decals or leaf charms under a clear topcoat for a unique twist on classic manicure sets.
Cleaning Acrylic Brushes, Dappen Dish, and Nail Accessories
Keeping acrylic brushes, dappen dish, and nail accessories clean is essential. Proper cleaning prevents product buildup and extends tool life. Clean tools help ensure each acrylic manicure set delivers smooth, safe results. Regular maintenance supports better nail art and manicure hygiene.
Use acetone or brush cleaner on your acrylic brush after each nail enhancement. Rinse the dappen dish with acetone to remove monomer residue. Clean nail tools and nail tips set with soap and water. Effective cleaning keeps your acrylic nail tools ready for use. Next, explore Maintenance routines for reusable acrylic nail tools.
Maintenance routines for reusable acrylic nail tools
- Wipe acrylic nail brushes gently with lint-free pads soaked in acetone after each manicure.
- Soak the dappen dish in warm soapy water to remove leftover monomer and acrylic powder.
- Disinfect nail tools like files and cuticle pushers regularly to prevent cross-contamination between artificial nails.
- Store clean acrylic nail accessories and nail tips set in a dry, dust-free nail supply box.
Managing Acrylic Lift, Breakage, and Common Application Issues
Acrylic nail sets can sometimes lift, break, or show flaws after application. These issues affect the durability of your manicure set. Common problems include cracked acrylic, lifting at the cuticle, or broken artificial nails. Proper nail care and technique help prevent these setbacks.
Using the right primer, acrylic powder, and nail tool reduces breakage. File and prep the nail well before applying acrylic. Keep nail accessories and brushes clean to avoid contamination. Many users face these challenges with acrylic nails. Next, learn about Troubleshooting frequent problems in acrylic nail sets.
Troubleshooting frequent problems in acrylic nail sets
- Use a primer and dehydrator to reduce lifting in your acrylic manicure set.
- File artificial nails with proper nail tools to prevent cracks and maintain nail extension strength.
- Remove excess acrylic powder buildup around the cuticle area to avoid premature nail enhancement lifting.
- Gently buff the surface of your acrylic nail design before applying a topcoat for smoother results.
Safe Removal with Acetone, Files, and Nail Care Techniques
Removing an acrylic nail set safely protects your natural nails. Use acetone, nail files, and gentle nail care tools for best results. Proper technique prevents damage. Removing acrylic nails carefully supports healthy manicure routines and nail enhancements.
Soak artificial nails in acetone to soften acrylic powder. Use a nail file to remove residue and smooth the nail surface. Avoid forcing or prying off acrylics. Maintain nail health by using the right nail tool and gentle habits. Next, discover gentle removal methods to protect natural nails.
Gentle removal methods to protect natural nails
- Wrap each artificial nail in acetone-soaked pads and cover with foil to gently dissolve acrylic powder.
- Use a fine-grit nail file to remove softened acrylic layers without scraping the natural nail surface.
- Apply cuticle oil after removal to restore moisture and support nail health during your manicure routine.
- Switch to a nail buffer for final smoothing instead of metal tools to minimize damage to nail enhancements.
Long-Term Nail Health, Aftercare, and Manicure Maintenance
Maintaining nail health after using an acrylic nail set is important. Proper aftercare helps prevent damage and supports strong natural nails. Regular manicure routines and gentle nail care protect your nails after artificial nails or any acrylic enhancement.
Moisturize cuticles daily and avoid harsh nail tools. Let your nails rest between acrylic sets or overlays. Use nourishing nail polish or a protective topcoat. Keep nails trimmed and shaped with a quality nail tool. Next, discover ongoing care tips for healthy nails post-acrylics.
Ongoing care tips for healthy nails post-acrylics
- Limit use of nail polish remover with acetone to prevent excessive dryness after removing an acrylic set.
- Gently file natural nails with a soft nail tool to maintain shape and avoid splitting.
- Apply a nourishing cuticle oil daily to support nail bed recovery following artificial nail enhancements.
- Incorporate a strengthening nail treatment or clear gel polish in your manicure routine to reinforce weakened nails.
Final Thoughts:
An acrylic nail set offers a versatile solution for anyone seeking salon-quality manicure results at home, combining durability, creative nail art options, and a wide range of nail enhancements. By choosing the right acrylic nail kit and using essential tools like a high-quality brush and primer, you can achieve stunning designs while maintaining nail health. Whether you’re a beginner or an experienced nail enthusiast, now is the perfect time to explore new nail trends and experiment with different nail shapes. Ready to elevate your beauty routine? Choose your ideal set and start creating today!
Frequently Asked Questions (FAQs)
What is typically included in an acrylic nail set?1
Answer: An acrylic nail set contains acrylic powder, monomer liquid, nail tips, primer, and a brush. Nail file, buffer, and dappen dish are also included. Nail art accessories, topcoat, and instructions often complete the manicure set. These essentials support nail enhancement and artificial nails.
How do you properly apply acrylic nails using a kit at home?2
Answer: Prep nails with primer and dehydrator. Attach nail tips or forms. Mix acrylic powder and liquid in a dappen dish. Use a brush for smooth application. Shape with a nail file. Finish with topcoat and nail polish. This acrylic nail set process supports nail art and overlays.
What tools are essential for achieving a smooth acrylic nail finish?3
Answer: Use an acrylic brush, nail file, buffer, dappen dish, and primer. These nail tools help apply acrylic powder and monomer liquid evenly. A topcoat and cuticle pusher are also important. These essentials ensure a polished manicure set and flawless nail enhancement.
How can you shape acrylic nails into almond, squoval, or French styles?4
Answer: File artificial nails with a nail file or buffer. Sculpt acrylic powder with a brush and monomer liquid. Use nail tips for desired nail shape. Apply topcoat for a finished look. This acrylic nail set technique works for almond, squoval, or French nail designs.
What are common reasons for lifting or breakage in acrylic nail sets?5
Answer: Lifting or breakage happens from poor prep, oily nails, or skipped primer. Using low-quality acrylic powder, weak monomer liquid, or improper brush technique also causes issues. Incorrect nail file use or damaged nail tips can weaken nail enhancements in an acrylic nail set.
How do you safely remove acrylic nails without damaging your natural nails?6
Answer: Soak nails in acetone pads or dappen dish. Gently file away softened acrylic powder. Avoid prying or scraping with metal nail tools. Use a buffer to remove residue. Moisturize with cuticle oil after removal. This acrylic nail set method keeps natural nails healthy.
What steps should you follow to clean and maintain acrylic nail tools?7
Answer: Wipe brushes with acetone after each manicure set. Rinse dappen dish and nail file in warm, soapy water. Disinfect nail tools and buffer regularly. Store nail accessories, powder, and tips in a dry place. Clean tools keep your acrylic nail set ready for use.
How can you keep your nails healthy after using an acrylic nail set?8
Answer: Apply cuticle oil daily to support nail health. Limit acetone nail polish remover use. Gently file nails with a soft nail file. Use nourishing nail treatments between manicure sets. Moisturize after acrylic nail set removal. Healthy nails need regular nail care and topcoat protection.
Social Media Links
- nailsxmina (Instagram)
- klawsbysonia (Instagram)
- Diamond Nails Salon 4 (Facebook)
- Yaya Nailz (Facebook)
Last Updated on February 13, 2026 by msj484
DISCLAIMER (IMPORTANT): This information (including all text, images, audio, or other formats on FamilyHype.com) is not intended to be a substitute for informed professional advice, diagnosis, endorsement or treatment. You should not take any action or avoid taking action without consulting a qualified professional. Always seek the advice of your physician or other qualified health provider with any questions about medical conditions. Do not disregard professional medical advice or delay seeking advice or treatment because of something you have read here a FamilyHype.com.