
A gel nail kit is the ultimate solution for achieving salon-quality gel nails and creative nail art at home. Whether you’re a beginner exploring your first diy gel nail kit or a seasoned enthusiast upgrading your manicure kit, today’s options cater to every style and skill level. This comprehensive guide explains essential gel polish components, LED lamp technology, and must-have nail tools, plus expert tips for safe application, long-lasting results, and choosing vegan or non-toxic gel nail products. Discover everything you need to create flawless, durable manicures with your perfect gel nail kit.
Featured Products
Best Overall • Best Value • Premium Option


Note: As an Amazon Associate I earn from qualifying purchases. Some of the links on this site are affiliate links — when you buy through those links, I may earn a small commission at no extra cost to you.
Essential Gel Nail Kit Components and Polish Selection
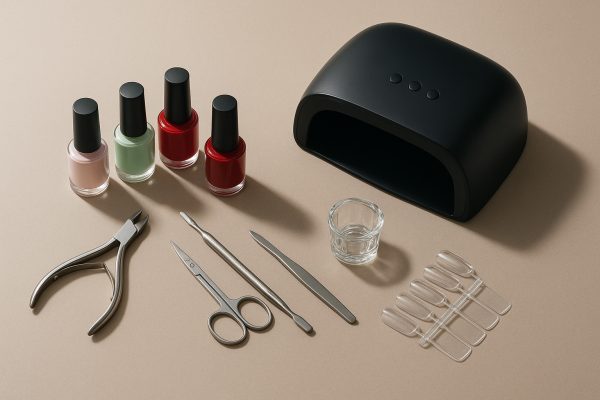
A gel nail kit contains all the basics for a salon-style manicure at home. Kits usually include gel polish, a curing lamp, and essential nail tools. These sets are designed for beginners and pros who want lasting gel nails without salon trips.
Choosing the right gel kit means considering the polish range, lamp type, and included accessories. Some sets focus on nail art or extensions, while others offer classic gel colors. Most kits fall between $25–$80 per kit. Next, see the Key Items Included in Every Gel Nail Kit.
Key Items Included in Every Gel Nail Kit
- Every gel nail kit features a curing lamp, usually LED or UV, for setting gel polish and ensuring a durable manicure.
- Kits supply gel nail tools like buffers, cuticle pushers, and files, supporting proper nail preparation and gel application.
- Most sets include a base coat, topcoat, and a selection of gel polish colors, allowing for versatile nail art and design.
- Acetone remover or soak-off wraps are often provided for safe and effective gel nail removal at home.
LED Lamp Technology, Nail Extensions, and Safety Care
LED lamp technology is essential for curing gel polish and creating lasting gel nails. Nail extension kits add length and design options to your manicure. Safety care helps protect your nails, skin, and hands during every gel nail application or removal.
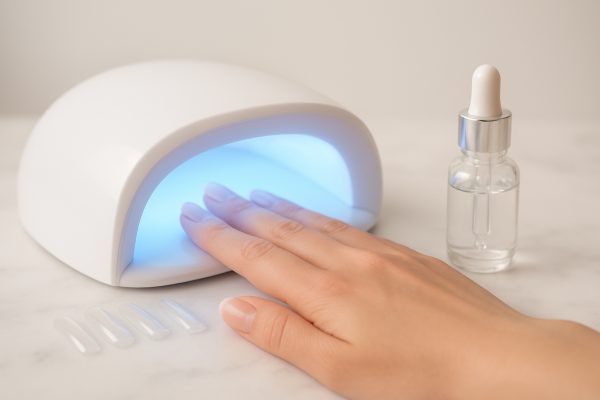
A quality gel nail kit includes a reliable LED or UV lamp. Nail extension kits offer forms, builder gel, or tips for different looks. Always use gel nail tools carefully to avoid skin contact with gel. Next, learn more by exploring Choosing Lamps and Extensions for Safe Application.
Choosing Lamps and Extensions for Safe Application
- Select a gel uv nail kit with a high-wattage LED lamp to ensure complete curing and prevent gel polish peeling.
- Use nail extension kit forms or tips that fit your natural nails snugly for a secure gel nail design.
- Prioritize gel nail accessories like cuticle guards to protect skin from uncured gel during application.
- Follow all gel nail tools instructions to minimize risk and achieve salon-quality nail enhancement kit results at home.
Nail Tools, Buffers, and Cuticle Maintenance Solutions
Nail tools, buffers, and cuticle maintenance solutions keep gel nails healthy and smooth. These essentials help prep the nail surface for any gel nail kit or manicure kit. Clean, shaped nails provide a strong base for any gel polish or nail extension kit.
Buffers even out the nail plate. Cuticle pushers and trimmers remove extra skin for a neat look. These gel nail tools cost around $5–$15 per kit. Quality nail care makes gel nail application easier. Next, discover Essential Tools for Prepping and Maintaining Nails for best results.
Essential Tools for Prepping and Maintaining Nails
- A nail kit should include a fine-grit buffer and a durable nail file for shaping and smoothing the nail gel surface.
- Cuticle care tools, like pushers and trimmers, help prepare nails for gel polish or acrylic nail kit application.
- Lint-free wipes and nail cleanser remove oils and debris, ensuring gel polish adheres smoothly during manicure kit prep.
- A quality nail brush is essential for cleaning around the nail art area and removing excess gel.
Applying Gel Polish, Base Coat, and Topcoat Layers
Applying gel polish, base coat, and topcoat layers is the foundation of every gel nail kit. Each layer has a purpose. The base coat protects natural nails, gel polish adds color, and the topcoat seals the shine. These steps create a professional gel manicure at home.
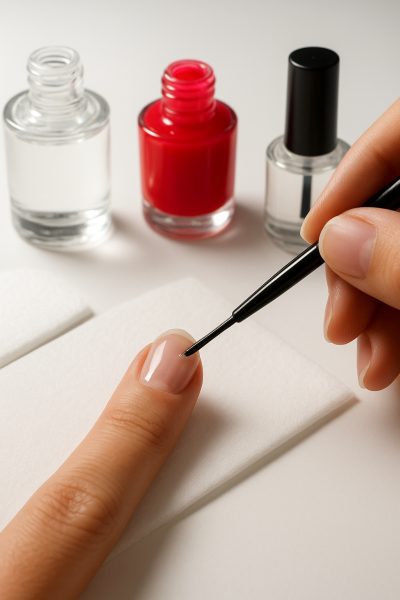
Using a diy gel nail kit, start with clean nails and thin layers. Cure each coat under your led lamp. This method works for both a beginner gel nail kit and a professional gel nail kit. For best results, follow a clear process like the Step-by-Step Process for Flawless Gel Application.
Step-by-Step Process for Flawless Gel Application
- Apply a thin base coat from a gel nail starter kit and cure under the led lamp for even coverage.
- Brush on your chosen gel nail polish color, ensuring the nail gel does not touch cuticles or skin.
- Seal the manicure with a topcoat from your nail kit, then cure to lock in shine and durability.
- Wipe nails with lint-free pads from your nail care kit to remove any sticky residue after the final cure.
Gel Nail Removal Techniques, Acetone, and Nail Health
Removing gel nails at home requires careful steps. Most gel nail kits recommend acetone for safe polish removal. Proper technique helps protect nail health and maintain smooth results. Using the right nail tools kit and following safety tips prevents unnecessary damage to natural nails.
Acetone removers are the most effective for breaking down gel polish. Buffers, lint-free wipes, and soak-off wraps help speed up the process. Avoid peeling off gel polish by hand, as it can harm the nail gel surface. Up next, explore Effective and Gentle Methods for Removing Gel Polish to keep nails healthy.
Effective and Gentle Methods for Removing Gel Polish
- Wrap each fingernail with acetone-soaked pads and secure using foil or reusable clips from your gel nail removal kit.
- Gently push away softened gel polish with a cuticle pusher or nail art stick to protect nail health.
- Use a fine-grit buffer from your nail tools kit to remove stubborn gel layers without scraping the nail plate.
- Moisturize nails and cuticles with nourishing nail care products after every gel polish kit removal session.
Storing Gel Nail Accessories, Colors, and Supplies Safely
Storing your gel nail kit, gel nail polish, and nail tools correctly keeps everything fresh and ready. Direct sunlight and heat can damage polish colors and accessories. Store gel nail accessories in a cool, dry place. Protect your gel nail products from spills and dust.
Use clear bins or nail art cases to keep gel kits and manicure kit items organized. Make sure nail gel bottles stand upright to prevent leaks. Separate nail art, buffers, and gel nail extension kit tools. Keeping your supplies safe helps them last longer. Next, explore Organization Tips for Preserving Kit Quality and Longevity.
Organization Tips for Preserving Kit Quality and Longevity
- Sort your gel nail polish kit colors by shade or finish to make selecting gel polish and glitter quick and easy.
- Use labeled dividers in your nail art set to keep nail tools and brushes separated and tangle-free.
- Store your acrylic gel nail kit accessories in stackable trays to prevent lost manicure kit pieces and keep supplies tidy.
- Rotate your gel nail products regularly so older nail gels and topcoat are used before they expire.
Troubleshooting Curing, Lamp Issues, and Polish Performance
Many gel nail kit users face curing issues, lamp malfunctions, or polish problems. These challenges affect both beginner gel nail kit and professional gel nail kit results. Quick troubleshooting helps keep your gel manicure smooth and lasting.
Weak LED lamp power, thick gel polish, or faulty nail tools can cause problems. Gel polish may wrinkle, chip early, or fail to cure. At-home gel nail kits often need simple fixes. Explore Common Problems and Reliable Solutions for Home Kits to troubleshoot these issues easily.
Common Problems and Reliable Solutions for Home Kits
- Apply gel polish in thin layers to prevent wrinkling or incomplete curing with your gel uv nail kit.
- Replace the led lamp bulb or check power connections if your gel nail kit lamp fails to turn on.
- Use a nail cleanser to remove oils that can cause gel polish to lift or chip in a manicure kit.
- Store gel nail products in a cool, dry place to maintain gel polish consistency and avoid thickening.
Enhancing Nail Art Design with Glitter and Brushes
Glitter and brushes bring new possibilities to gel nail art. These accessories help create unique gel polish looks. Add sparkle, texture, or bold lines to any gel nail kit design. Nail art becomes more creative and fun with these essential nail gel tools.
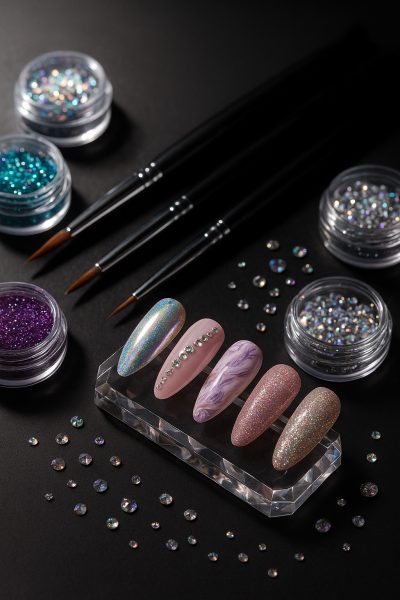
Use a nail art set with fine brushes to paint details or ombré effects. Apply glitter for accent nails or all-over shine. Many gel nail kits include both tools for under $10–$20 per set. Learn how to master these looks in Creative Tools and Techniques for Unique Nail Art.
Creative Tools and Techniques for Unique Nail Art
- Use a fine-tipped brush from your nail art set to create detailed gel nail designs with gel polish.
- Add loose glitter or sequins from your nail kit for textured effects in your gel manicure kit creations.
- Try layering different nail gels and colors to achieve ombré or marble patterns in your nail art gel kit.
- Incorporate dotting tools and striping brushes as gel nail accessories to experiment with geometric nail art.
Ensuring Vegan, Non-Toxic, and Allergy-Friendly Nail Products
Many gel nail kit options now focus on safer, ethical formulas. Vegan and non-toxic gel nail polish avoids animal products and harsh chemicals. Allergy-friendly nail art products help reduce skin irritation. These choices support healthy nails and mindful beauty routines.
Look for gel nail kits labeled “vegan,” “non-toxic,” or “cruelty-free.” Always check gel polish and nail gel ingredient lists for allergens. Acrylic gel nail kit options may also offer gentle formulas. Understanding these choices starts with Identifying Safe and Ethical Gel Nail Kit Ingredients.
Identifying Safe and Ethical Gel Nail Kit Ingredients
- Check that your gel nail kit is labeled as “5-free” or “7-free” to avoid harsh chemicals in your manicure kit.
- Review gel nail polish kit ingredient lists for common allergens and opt for nail gels with plant-based or hypoallergenic formulas.
- Choose nail art gel kit options that are certified cruelty-free and avoid animal-derived ingredients in nail care.
- Look for gel polish kits with transparent labeling and batch codes to trace nail supplies and ensure product safety.
Maximizing Manicure Longevity and At-Home Nail Care
Achieving long-lasting results from your gel nail kit means proper care at every step. At-home gel manicure kits make it easier to keep nails strong and glossy. Nail gel users want polish that stays vibrant and chip-free for weeks.
Daily hand care and gentle nail treatment extend gel manicure life. Using gel nail tools and nail care kit items helps prevent lifting or chipping. Regular use of cuticle oil keeps gel nails and nail art looking fresh. Explore Proven Tips to Extend the Life of Gel Manicures for more expert advice.
Proven Tips to Extend the Life of Gel Manicures
- Cap the free edge of each nail with gel polish to reduce chipping and peeling.
- Avoid using nails as tools to protect your gel manicure kit results from early wear.
- Apply cuticle oil daily to maintain nail gel flexibility and prevent cracks in your manicure kit finish.
- Wear gloves during household cleaning to shield your gel nails and nail art from harsh chemicals.
Final Thoughts:
A gel nail kit offers an accessible way to achieve salon-quality gel nails at home, combining convenience, cost savings, and creative flexibility. With the right nail tools kit and beginner gel nail kit, you can experiment with nail art and various gel polish colors while maintaining healthy nails. Prioritize kits with safe, vegan ingredients and quality accessories for the best results. Ready to upgrade your manicure routine? Explore different gel nail kits and find the perfect match for your style and nail care needs today.
Frequently Asked Questions (FAQs)
What essential items should be included in a gel nail kit for home use?1
Answer: Every gel nail kit should have a led lamp, gel polish, nail tools, base coat, and topcoat. Include buffers, cuticle pushers, and remover wraps. Add nail art accessories, glitter, and brushes. Nail gel, polish, and manicure kit items are essential. Proper nail care ensures professional nail salon results at home.
How does an LED lamp in a gel nail kit affect curing time and safety?2
Answer: An LED lamp in a gel nail kit cures gel polish quickly. Lamp wattage affects curing speed and polish finish. LED lamps reduce UV exposure for nail care safety. Nail gel sets faster than with UV. Proper curing prevents lifting and nail damage in any manicure kit or gel nail application kit.
What steps are involved in properly applying gel polish from a gel nail kit?3
Answer: Prep nails with nail tools and a buffer. Apply base coat from the gel nail kit. Cure under the led lamp. Use gel polish in thin layers. Cure each layer separately. Finish with a topcoat. Nail art and glitter can be added. This ensures a smooth manicure kit finish.
How do you safely remove gel polish using a gel nail kit without damaging your nails?4
Answer: Soak nails with acetone remover from your gel nail kit. Wrap with remover clips or foil. Wait for nail gel to soften. Gently push off polish with a cuticle pusher. Avoid scraping nail gel. Buff lightly with a nail file. Moisturize nails and cuticles after using your manicure kit.
What should you look for in a gel nail kit to ensure it is vegan and non-toxic?5
Answer: Choose a gel nail kit labeled vegan and non-toxic. Check for “5-free” or “7-free” on the nail gel polish. Review ingredient lists for harmful chemicals. Look for cruelty-free nail accessories. Ethical nail art and gel polish kit items support safe nail care. Transparent labeling ensures a quality nail kit.
How can you organize and store gel nail kit supplies to maintain their quality?6
Answer: Store your gel nail kit in a cool, dry place. Use bins for nail gel, polish, and nail tools. Keep manicure kit accessories in labeled trays. Stand gel polish upright to prevent leaks. Separate nail art, glitter, and brushes. Proper storage preserves nail care and gel polish kit quality.
What are common problems when using a gel nail kit at home and how can they be fixed?7
Answer: Gel nail kit users face curing, lamp, or polish issues. Apply gel polish in thin layers. Replace led lamp bulbs if weak. Use nail cleanser for better adhesion. Store nail gel and manicure kit items properly. Buff nails before gel polish application. Troubleshoot with nail tools for best nail art results.
How can you extend the longevity of your gel manicure with a gel nail kit?8
Answer: Cap nail edges with gel polish from your gel nail kit. Use cuticle oil daily for nail care. Avoid using nails as tools. Wear gloves when cleaning. Proper nail art, gel polish application, and topcoat help. Regularly maintain nails with your manicure kit for lasting nail gel results.
Social Media Links
- nailsxmina (Instagram)
- klawsbysonia (Instagram)
- Diamond Nails Salon 4 (Facebook)
- Yaya Nailz (Facebook)
Last Updated on February 13, 2026 by msj484
DISCLAIMER (IMPORTANT): This information (including all text, images, audio, or other formats on FamilyHype.com) is not intended to be a substitute for informed professional advice, diagnosis, endorsement or treatment. You should not take any action or avoid taking action without consulting a qualified professional. Always seek the advice of your physician or other qualified health provider with any questions about medical conditions. Do not disregard professional medical advice or delay seeking advice or treatment because of something you have read here a FamilyHype.com.