
A press on nails kit offers a fast, affordable way to achieve salon-quality manicures at home, transforming your nail routine with minimal effort. Whether you’re seeking a diy press on nails kit for custom nail art or an artificial nails kit with trendy shapes like almond or stiletto, there’s a perfect match for every style. This guide explores everything from choosing the right nail color and shape to safe removal, nail health, and creative decoration with rhinestones or glitter—plus expert tips for making your next manicure last longer and look flawless.
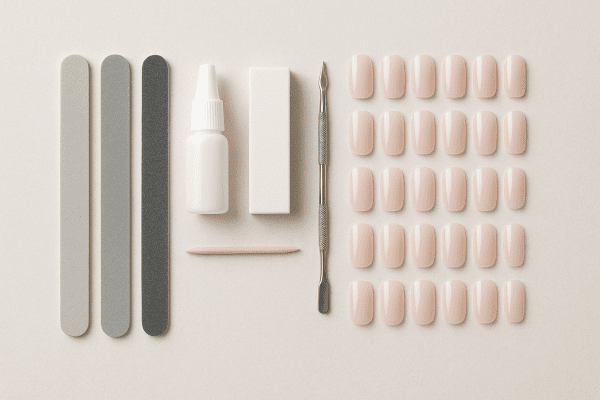
Essential Nail File, Glue, and Press On Kit Components
A press on nails kit comes with everything needed for fast, easy nail application. Essential tools include a nail file, glue or adhesive tabs, and a range of artificial nails. These kits help you achieve salon-quality nail art at home.
Most kits include a mini nail file for shaping, glue for secure wear, and a decorative nails kit with multiple nail shapes. Some kits offer extra items like a cuticle stick or buffer. Pricing typically ranges from $8–$22 per kit. Next, explore key items included in a standard press on kit.
Key items included in a standard press on kit
- Many diy press on nails kits feature adhesive tabs for quick, mess-free nail application.
- A nail art kit may include decorative accents like rhinestones or glitter for custom designs.
- Most artificial nails kits provide multiple nail shapes such as stiletto, almond, or coffin.
- Some gel press on nails kits come with a mini buffer and cuticle pusher to prep the nail surface.
Choosing Nail Shape, Length, and Color for Style
Picking the right nail shape, length, and color is key to your look. Press on nails kits offer styles like almond, stiletto, or coffin. Popular shades include pink, red, and pearlescent. Choose from short or long nails to suit your mood and event.
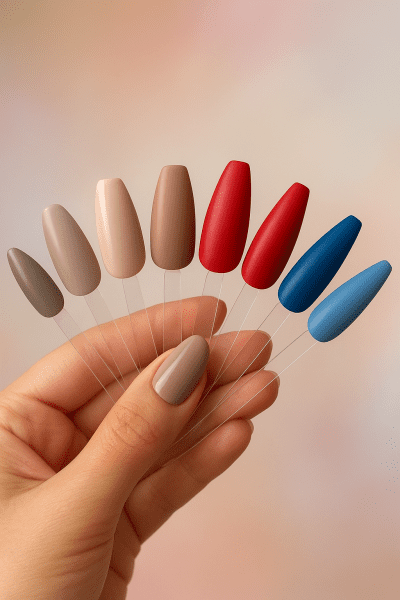
Some artificial nails kits let you mix shapes and nail art finishes. Gel press on nails kits can feature velvet or glitter accents for added flair. Many diy press on nails kit options cost around $10–$20 per set. Next, see tips for matching nail shapes and colors to personal preferences.
Matching nail shapes and colors to personal preferences
- Choose an almond or stiletto shape for a modern, elongated look in your press on nails kit.
- Opt for gel nails kit options in pearl or velvet finishes to add subtle luxury to your manicure.
- Select a nail art kit with red or rose tones for statement nails on special events.
- Try a diy press on nails kit with short, squoval nails for a comfortable, everyday style.
Gel Polish Application Techniques for Press On Nails
Gel polish can transform a press on nails kit into a salon-quality manicure. Applying gel polish to artificial nails gives a high-gloss, durable finish. This technique works for both diy press on nails kit and gel press on nails kit sets.
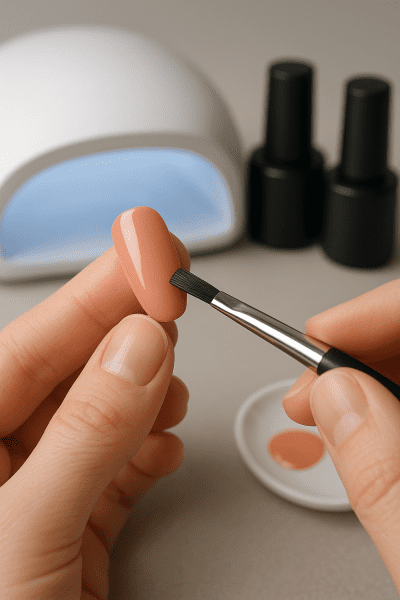
Always start with clean, shaped nails from your nail kit. Use gel polish for colors like pearl, red, or velvet. A gel nails kit may include a brush and UV lamp for curing. For best results, follow step-by-step methods for smooth gel polish finish.
Step-by-step methods for smooth gel polish finish
- Lightly buff each artificial nail from your diy press on nails kit before applying gel polish for better adhesion.
- Apply a thin base coat from your gel nails kit and cure under a UV lamp to prep the surface.
- Use a nail art kit brush to layer color, like pearl or red, ensuring even coverage on every nail tip.
- Seal your press on nail set with a glossy top coat and cure again for a durable, salon-style manicure.
Safe Removal of Adhesive, Acrylic, and Fake Nails
Safe removal of a press on nails kit prevents nail damage. Use gentle methods to detach artificial nails or acrylic press on nails kit. Avoid pulling or prying. Proper removal helps protect your real nail and cuticle health.
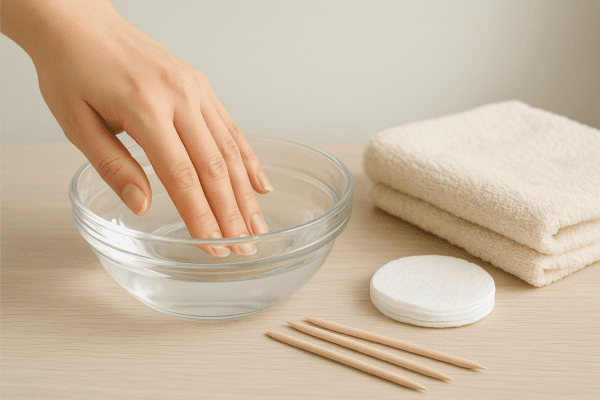
Soak nails in warm, soapy water to loosen glue or adhesive. Use a cuticle stick from your nail kit for careful lifting. Avoid harsh force on gel nails kit or fake nails kit. Next, learn gentle techniques to minimize nail and skin damage.
Gentle techniques to minimize nail and skin damage
- Gently twist each artificial nail from your diy press on nails kit after soaking to avoid stressing the cuticle.
- Use a wooden stick from your nail art kit to slowly lift the edge of false nails kit tips.
- Apply cuticle oil around the nails kit area before and after removal to protect skin and promote nail health.
- Remove leftover adhesive from your gel nails kit with a soft buffer instead of scraping to prevent real nail thinning.
Maintaining Nail Health with Regular Kit Care
Proper care is essential when using any press on nails kit. Regular maintenance helps prevent nail damage and keeps your manicure looking fresh. Focus on gentle removal of fake nails kit pieces and avoid harsh scraping. Healthy natural nails support better results from every nails kit.
Clean your nail kit tools after each use to prevent bacteria. Moisturize cuticles and apply nail oil between applications of your acrylic press on nails kit. Avoid wearing artificial nails kit sets for more than ten days. These habits lead directly into routine practices for strong and healthy natural nails.
Routine practices for strong and healthy natural nails
- Use a nail art kit with cuticle oil to hydrate after removing your press on nails kit.
- Gently buff nails with your nail file before reapplying any artificial nails kit to avoid surface buildup.
- Give your nails a break between each gel nails kit application to support natural strength.
- Sanitize all nail supplies and your nail tips kit regularly to prevent bacteria and promote healthy growth.
Decorating with Rhinestones, Glitter, and Nail Art Tools
Decorating your press on nails kit with rhinestones, glitter, or nail art tools adds instant flair. These accessories transform basic artificial nails kit sets into unique nail art kit looks. Simple additions like gel polish or bead accents give every nails kit a personal touch.
Use a nail art kit brush to place rhinestones or create glitter gradients. Many diy press on nails kit options include small gems, pearl flatbacks, or flower decals. Affordable nail decoration kit add-ons cost around $5–$10 per set. Next, explore Popular nail art accessories and easy decoration ideas for creative inspiration.
Popular nail art accessories and easy decoration ideas
- Accent your press on nails kit with silver or rose rhinestones using a nail art kit for quick glam.
- Add gradient glitter from a nail decoration kit to almond or coffin artificial nails for a festive look.
- Use gel polish and a fine brush from your diy press on nails kit to create leopard or polka dot designs.
- Apply small flower decals or bead accents from a nail designs kit to personalize any fake nails kit.
Storing Press On Nail Kits for Long-Term Use
Proper storage extends the life of any press on nails kit. Keep your artificial nails kit, gel nails kit, and nail art kit in a cool, dry place. Avoid direct sunlight and moisture. Protect rhinestones, glue, and decorative accents from heat.
Use small containers to sort each nail kit by shape, color, and nail file. Store adhesive, bead, and glitter items in separate bags or trays. Keep your nail supplies organized to prevent loss and damage. Here are some organization tips to keep kits fresh and complete.
Organization tips to keep kits fresh and complete
- Separate each artificial nails kit and nail art kit in stackable containers labeled by color and shape for easy access.
- Store extra glue, gel polish, and rhinestones from your nail decoration kit in airtight pouches to prevent drying or spills.
- Keep a small tray for loose nail tips kit pieces, bead accents, and small glitter jars to avoid misplacing parts.
- Use a checklist to track your nails kit press on inventory and replace missing or used nail supplies regularly.
Troubleshooting Fit, Sizing, and Adhesive Issues
Many users face challenges with artificial nails kit fit, sizing, and adhesive performance. Press on nails kit pieces may feel too tight, loose, or may not stick well. Getting the right nail shape and secure hold is essential for a comfortable, long-lasting manicure.
Issues like glue mess, uneven nail tips kit sizing, or popping nails can frustrate even diy press on nails kit fans. Using the right gel nails kit adhesive and prepping nails helps improve results. Learn practical fixes in the next section on Common problems and solutions for better kit results.
Common problems and solutions for better kit results
- Trim and shape each nail tips kit piece to match your natural curve and avoid discomfort.
- Apply a thin layer of glue from your gel nails kit to prevent excess adhesive spilling onto the cuticle area.
- Use a nail file from your artificial nails kit to gently refine edges for a seamless fit.
- Select a press on nail set with multiple sizes to improve fit for wide or narrow nail beds.
Enhancing Durability with UV Gel and Polish
Using UV gel and polish can make a press on nails kit last longer. The gel creates a hard, glossy layer over each artificial nail. This technique is popular for those wanting extra durability with their gel nails kit or diy press on nails kit.
Apply gel polish over your fake nails kit, then cure each nail under a UV lamp. This process adds strength and helps prevent chipping. Many users choose pearl or red finishes for added style. To get the best results, explore Methods to increase press on nail longevity.
Methods to increase press on nail longevity
- Lightly buff the artificial nails kit surface before applying gel polish to improve bond strength.
- Seal edges of each press on nail set with a thin layer of glue to reduce lifting.
- Avoid soaking your fake nails kit in water for prolonged periods to help maintain adhesion.
- Apply a layer of clear gel from your diy press on nails kit every few days to reinforce the manicure.
Eco-Friendly Packaging and Recycled Materials in Kits
More press on nails kit options now use eco-friendly packaging and recycled materials. Many nail kits come in boxes made from recycled cardboard or paper. Some nail art kit sets avoid plastic. This shift helps reduce waste from artificial nails kit packaging.
Affordable press on nails kit brands use less plastic for trays and glue tubes. Kits may feature recycled bead containers and biodegradable wrapping for gel nails kit supplies. Consumers want sustainable choices with every nail kit. These changes connect directly with sustainable materials and packaging trends in nail kits.
Sustainable materials and packaging trends in nail kits
- Many affordable press on nails kit options now use recyclable paper trays for storing nail tips kit pieces.
- Artificial nails kit packaging often eliminates single-use plastics in favor of compostable bead and glitter containers.
- Some diy press on nails kit sets feature soy-based ink and minimalist labels for a lower environmental impact.
- Nail art kit and gel nails kit supplies may arrive in reusable pouches to reduce wasted materials like adhesive tubes and rhinestones.
Final Thoughts:
A press on nails kit offers an easy, affordable way to achieve salon-quality manicures at home while protecting your natural nails. With options ranging from gel nails kit sets to decorative nails kit choices, there’s something for every style—from classic almond shapes to pearl-accented designs. Whether you’re new to artificial nails or looking to expand your nail art collection, explore the latest nail supplies and find a kit that fits your needs. Start experimenting today for beautiful, customizable results in minutes!
Frequently Asked Questions (FAQs)
What essential tools and components are typically included in a press on nails kit?1
Answer: A press on nails kit includes artificial nails, glue, a nail file, and adhesive tabs. Nail art kit options add rhinestones or glitter. Some gel nails kit sets have a buffer and cuticle stick. Decorative nails kit versions may include bead or flower accents. Nail tips kit pieces come in several shapes and lengths.
How do I choose the right nail shape, length, and color in a press on nails kit?2
Answer: Select a press on nails kit with stiletto, almond, or coffin nail shapes. Choose pink, red, or pearlescent color for style. Gel nails kit sets offer velvet or glitter finishes. Use a nail art kit for custom options. Match artificial nails kit pieces to your event or mood.
What is the best way to apply gel polish to press on nails for a smooth finish?3
Answer: Prep your press on nails kit nails with a nail file and buffer. Apply gel polish from your gel nails kit in thin coats. Cure each layer under a UV lamp. Use a nail art kit brush for even color. Finish with a top coat for shine and durability.
What are the safest techniques for removing press on nails and adhesives?4
Answer: Soak your press on nails kit nails in warm, soapy water. Gently lift artificial nails kit pieces with a cuticle stick. Use a gel nails kit buffer to remove excess adhesive. Avoid pulling or prying with force. Apply cuticle oil from your nail art kit after removal.
How can I maintain the health of my natural nails while using press on nails kits regularly?5
Answer: Give nails a break between each press on nails kit application. Use a nail file and buffer gently. Apply nail oil or cream puff after using artificial nails kit pieces. Clean all gel nails kit tools. Keep cuticles hydrated with a nail art kit.
What accessories or tools are recommended for decorating press on nails with rhinestones or glitter?6
Answer: Use a nail art kit brush for precise bead or glitter placement. Add rhinestones from your press on nails kit using gel polish. Artificial nails kit sets may include flower or pearl accents. Nail decoration kit tools help with custom designs. Secure all decorations with glue from your gel nails kit.
How should I store my press on nails kit to keep the nails and adhesives in good condition?7
Answer: Store your press on nails kit in a cool, dry place. Keep artificial nails kit pieces in labeled containers. Seal glue and gel nails kit tubes tightly. Separate bead, glitter, and nail art kit items. Avoid heat and sunlight near your nail tips kit supplies.
What can I do if the press on nails from my kit don’t fit properly or don’t stay on securely?8
Answer: File artificial nails kit pieces for a better fit. Use extra glue from your press on nails kit. Buff natural nails before gel nails kit application. Choose nail tips kit sets with more size options. Clean nails with a nail art kit prep pad before applying.
Social Media Links
- nailswithaby (Instagram)
- innerbloom.nails (Instagram)
- vivianxrahey (Facebook)
- nailsby.ivvie (Facebook)
Last Updated on February 26, 2026 by Amaya Bradley
DISCLAIMER (IMPORTANT): This information (including all text, images, audio, or other formats on FamilyHype.com) is not intended to be a substitute for informed professional advice, diagnosis, endorsement or treatment. You should not take any action or avoid taking action without consulting a qualified professional. Always seek the advice of your physician or other qualified health provider with any questions about medical conditions. Do not disregard professional medical advice or delay seeking advice or treatment because of something you have read here a FamilyHype.com.