
Ready to make a skateboard press? We’ve all been there – staring at a generic press in a skateboard store, wishing the skateboard had more of our personal touch. With FamilyHype’s help, you can stop wishing and create your own press! This guide will help you with your very own skateboard mold right at home. It’s time to unleash your creativity and make that custom-designed board we’ve always wanted.
- We’ll first learn the basics of a skateboard press and then dive into gathering materials for the press, designing the press, making, molding, and finishing your unique skateboard press. Working on something like this isn’t just about crafting an object. It can be time-consuming, but the finished product will be worth it. There are good video tutorials you can watch for more details.
It’s about fostering self-expression through hands-on work. Are you ready to make your first-ever board mold? Skateboard molds are what shape the boards. Manufacturers mold the board into the mold to create various shapes and designs.
In this article, we’ll take a deep dive into the basic tools used to make a new DIY mold at home and ensure you understand its features and how to make it. By the end of this journey, we won’t be just consumers anymore but passionate creators, too, serving others by inspiring them with our ingenuity. Let’s shape it up together!
- We’ll explore all aspects of skateboards, from gathering materials and designing the skateboard press to molding and finishing the skateboard. We’re creating a custom-designed skateboard press, so it’s important to stay focused on the overall goal of crafting a unique board press.
FamilyHype encourages you to share your experience with us and let us know how you shape it up!
Materials In Making A Personalized Board Press
Let’s honor the craft of skateboarding by delving into the basics of making a board mold at home. Understanding the mechanics of a board mold is like taking a step back in time and peeking into the history.
A board mold is an essential tool for any skater, whether they’re creating a custom board or just maintaining the condition of their existing one. Here at FamilyHype, we believe in the power of the family unit, so we encourage you to keep the culture alive by sharing your feedback and experiences with us.
When it comes to making a board mold, you’ll need some basic materials. These include a workbench, clamps, wood, nails, screws, and a drill. As for the board itself, you’ll need the deck, trucks, wheels, grip tape, and hardware. By having all these materials, you can then start to assemble the mold and get to work.
Remember, this article focuses on understanding the basics of a board mold, so keep that in mind when tackling this project. With a few simple steps and the right materials, you can easily create your mold and ensure your board is in top shape. So, don’t forget to show your pride in skateboarding by creating your mold, and don’t forget to share your feedback and experience with us here at FamilyHype.
Gathering Your Materials And Constructing Your Own
If you want to embark on this exciting DIY project, you’ll need to gather specific materials such as wood, mold, build, glue, and more. You can have different molds to make different sizes for your skateboard.
Here at FamilyHype, we highly value the family unit and strive to reduce our environmental impact, so sourcing sustainable materials for your skateboard is essential.
- You’ll need wooden planks for the press, a hydraulic mold and foam for shaping, and glue and veneer strips. This will surely make a great press!
Now that you’ve got all of the items in your eco-friendly skateboarding toolkit let’s dive into designing your board.
To ensure this project is successful, it’s important to focus on creating a board that meets your needs.

With all of these items in mind, you can create a board that is perfect for you!
Designing Your Personalized Wooden Platform At Home
Now that we’ve gathered our materials, it’s time to dive into the exciting part – designing our board!
Designing a board allows you to infuse it with your unique personality and style, transforming it from a simple mode of transportation into a true expression of yourself. Whether you opt for custom grip tape art, unique graphics on the deck, or personalized stickers, the possibilities are endless.
Adding your touch to the board makes it visually appealing and reflects your interests, passions, and individuality. A personalized board becomes more than just a means of getting around; it becomes an extension of your identity, making every ride an authentic representation of who you are as a skateboarder and as a person.
We’ll be developing a template and choosing the size and shape of our board, which will truly make this board unique to us. Remember, there’s no right or wrong regarding these decisions – your board should reflect your style and meet your skating needs.
Create Your Board And Pressing Templates
- Crafting a template is the next exciting step in constructing your homemade mold. Template variation and blueprint analysis offer many possibilities for getting the perfect shape and size of board for you. Here’s how to get started: trace the desired shape on cardboard, cut it out to form a stencil, and use it as your guide.
- Building your own skateboard press involves applying a clear coat, a time-consuming but essential step. It’s important to use cookies and data depending on your settings to track outages and protect the process, helping to deliver and maintain Google services. This approach aids in assessing engagement and site statistics, guarding against spam, fraud, and abuse while fostering audience engagement and site loyalty. Implementing personalized content and ads helps to show personalized ads depending on utilizing site statistics to understand and maintain Google services.
- This process is crucial to measure audience engagement and enhance the quality of those services, like those seen on YouTube, as companies develop and improve new methods. Protecting the press with paint of many different types is vital, ensuring it is age-appropriate if relevant. This includes creating a YouTube homepage and tailored experience and understanding how our services are used to enhance the quality and effectiveness of ads. One must deliver and measure the effectiveness of these strategies, applying a sand technique to continue to YouTube for video recommendations and a customized YouTube experience.
- Managing your privacy settings is akin to applying a smooth finish, with ads based on past interactions and ad serving based on location. For more information, one might visit g.co/privacytools for a customized YouTube homepage. Applying multiple coats of a substance is an idea that echoes the site’s layered approach, with a thick layer ensuring sealing and protection.
At FamilyHype, we believe that serving others starts with perfection in every detail of what we do. And that’s why we’re here to help you find the ideal board shape and size for you. We encourage you to share your experience, opinions, and feedback about the content.
Our focus here is to help you craft the perfect template for your mold. So, let’s choose the ideal shape and size for you.
Different Shapes And Sizes
When choosing your board shape and size, you must consider what type of riding you’ll be doing most often. Skateboard aesthetics and board maneuverability are key considerations. Whether it’s a sleek silhouette for street cruising or a wider base for tricks and flips, it’s important to choose wisely.
Other macro terms related to this topic include skateboards, decks, skateboarding, street cruising, and tricks and flips. Micro terms might include kickflip, ollie, grind, and axle nuts.
Now that we’ve deliberated over shape and size let’s move forward with constructing our board mold at home.
We hope you enjoyed this article and would love to hear your feedback.

Construct It Yourself
Making your board mold can be a rewarding experience, and with a few key materials and tools, you can be ready to go in no time. Here at FamilyHype, we want to ensure you have all the information you need to build your mold successfully.
We’ll guide you through the steps of gathering materials such as plywood, screws, and glue, as well as mold maintenance and assembly instructions. Plus, we’ll provide you with important safety measures and tips on fine-tuning your mold to get the perfect board shaping.
Board construction is an exciting endeavor; you can take your homemade mold to the next level by utilizing it. Before you begin, make sure to have protective gear on hand and keep your tools clean and in good order. As with any project, it’s important to follow the instructions carefully and make sure to check your work as you go.
Once your mold is built, you’ll be ready to take on the challenge of customizing your skateboard deck with new features. You can easily shape, cut, and carve the deck with your mold, giving it the perfect look and feel. Share your progress with us, and let us know how your homemade press works for you!
Pressing Your Deck
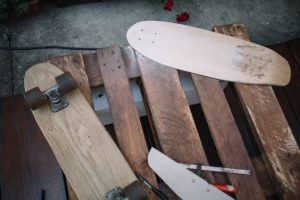
Now that we’ve built our skateboard mold, it’s time to dive into the thrilling process of molding our deck. This involves carefully layering and gluing our wood, then using our newly constructed press to shape it. When it comes to cheap DIY skateboard deck construction, molding your deck is crucial in achieving the desired shape and flexibility.
Using a vacuum bag and an air press system, such as the Thin Air Press, you can mold layers of Canadian maple veneer into a sturdy board mold. The foam mold, combined with the vacuum bag, applies even pressure to the deck during the bonding process, ensuring a strong and durable board. This integral part of board-making allows enthusiasts to customize their boards, creating unique and personalized rides for their skate sessions.
Trust us, there’s nothing quite like seeing your very own custom board come to life before your eyes!
Layering And Gluing
If you’re creating a board mold at home, don’t underestimate the importance of properly layering and gluing the wood. This step is crucial for achieving the desired shape and durability. Here at FamilyHype, we believe picking the right wood types and using the right adhesives to ensure optimal bonding is important.
When selecting wood, consider sturdy, flexible types that have been properly dried and have the grain running in the correct direction. Strong adhesives like epoxy or wood glue should be used to ensure the wood layers are securely glued together. Make sure to apply the glue evenly to get the best results.
The board mold is an essential tool for skateboarders, so it’s important to get it right. We hope this article has been helpful to you, and we’d love to hear your feedback.
Using The Board Mold
Once you’ve meticulously layered and glued your wood, it’s time to master the art of using the mold with precision. At FamilyHype, we understand the importance of mold safety; always take precautions while working.
Additionally, regular mold maintenance ensures longevity and efficiency. After pressing, carefully remove your board and admire your handiwork. As we know, skateboards are a great way to experience the outdoors and have fun. Get creative, and make sure to share your skateboard with us by commenting below.
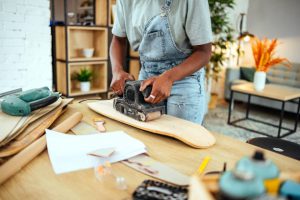
The next step in the rewarding process of making a skateboard is finishing it to achieve that professional look! Be sure to use the right materials, tools, and techniques to achieve the desired results. From sanding to staining and varnishing, these key components all play a role in the finished product.
We hope you enjoy the experience of making your board! Don’t forget to share your feedback below.
Finishing Your DIY Personalized Board
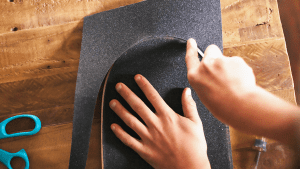
After all the hard work, it’s finally time to put the finishing touches on your DIY skateboard! Let’s make it stand out with some cool deck artwork. Choose a design that reflects you and apply it carefully.
Frequently Asked Questions (FAQs):
How Much Pressure Is Needed When Pressing A Board?
The exact pressure needed can vary depending on the specific materials and process used, but decks are typically molded with thousands of pounds of pressure in a hydraulic mold or vacuum mold.
How To Build A Vertboard Step By Step?
Making a skateboard involves several steps, including choosing components (deck, trucks, wheels, bearings, grip tape), assembling them, and adjusting for personal preferences. Detailed step-by-step guides are available online and in shops.
Can You Mold Skateboards Using Heat?
No, traditional decks are not heat-molded. They are typically cold-molded using hydraulic or vacuum molds to create the necessary strength and flexibility.
What Is The Best Way To Store Skateboards?
The best way to store skateboards is in a cool, dry place, preferably vertically, to prevent warping. Wall mounts or racks are excellent options for organized storage.
How Do You Make A Wall Mount?
You can make a wall mount using basic tools like screws, wall anchors, and L-shaped brackets. There are also pre-made skateboard wall mounts available for purchase.
What Do I Need To Construct Skateboards?
To build a skateboard, you need a deck, trucks, wheels, bearings, grip tape, and hardware (nuts and bolts). You’ll also need a skate tool for assembly.
How Do Boards Get Their Graphics?
Skateboard graphics are typically applied during the deck manufacturing process. Graphics can be screen-printed, heat-transferred, or digitally printed onto the deck’s bottom veneer.
Can You Construct Skateboards At Home?
You can build a skateboard at home with the right tools and components. Many skateboarders enjoy the DIY aspect of creating a custom board. When cutting a sheet for a project, as shown in many videos, it’s careful handling of the edges and precise placement of a hole for a screw that matters; using an optional but accurate tool with the right features can turn a cheap material into a valuable resource, making the project less expensive.
How Do You Rail Skateboards?
Railing a skateboard means grinding along a rail or edge. To do this trick, you’ll need to approach the rail at an angle, ollie onto it, and balance while grinding. It requires practice to master.
How Do You Set Up Trucks?
Setting up skate trucks involves attaching them to the deck using bolts and nuts, adjusting the tightness of the trucks with a skate tool, and ensuring they are aligned properly for stability and maneuverability. Skateboarders often fine-tune their truck settings to suit their riding style.
Last Updated on July 3, 2024 by Faith Ann Maglantay
DISCLAIMER (IMPORTANT): This information (including all text, images, audio, or other formats on FamilyHype.com) is not intended to be a substitute for informed professional advice, diagnosis, endorsement or treatment. You should not take any action or avoid taking action without consulting a qualified professional. Always seek the advice of your physician or other qualified health provider with any questions about medical conditions. Do not disregard professional medical advice or delay seeking advice or treatment because of something you have read here a FamilyHype.com.