
A windshield repair kit is an essential solution for anyone facing chips or cracks in their auto glass, offering a fast and affordable alternative to full windshield replacement. In this comprehensive guide, you’ll discover how a quality automotive glass repair kit uses advanced resin and injector tools to restore clarity and strength to your vehicle. We’ll walk you through the repair process, compare leading kits, explain UV curing, and share expert tips—helping you make the most of your repair kit and keep your car windshield in top condition.
Featured Products
Best Overall • Best Value • Premium Option


Note: As an Amazon Associate I earn from qualifying purchases. Some of the links on this site are affiliate links — when you buy through those links, I may earn a small commission at no extra cost to you.
Understanding Resin, Glass, and Injector Tool Components
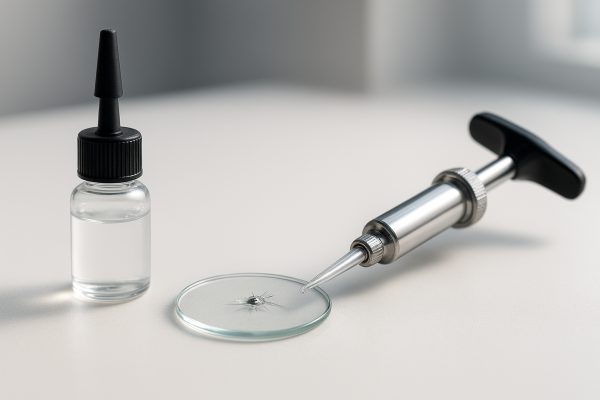
A windshield repair kit uses resin, injector tools, and curing strips. These parts work together to fix chips or cracks in auto glass. The resin fills gaps, while the injector pushes it in. Glass and tool quality affect the final repair.
Resin must match laminated glass to restore clarity and strength. Injector tools, like a syringe or bridge, control pressure and flow. Kits often include a razor blade for cleanup. Different car windshield repair kit options use unique tool layouts. Next, explore key materials and functions in windshield repair kits.
Key materials and functions in windshield repair kits
- UV curing enables the resin in a diy windshield repair kit to harden and bond with the auto glass surface.
- A syringe or plunger applies pressure, ensuring filler flows into the chip or crack in the windshield.
- Curing strips prevent moisture and dust from affecting the adhesive during the repair process.
- The bridge tool supports precise alignment when using a car windshield repair kit on damaged glass.
How UV Curing Enhances Windshield Repair Performance
UV curing is vital in any windshield repair kit. It uses ultraviolet light to harden the resin quickly. This process bonds the filler to the auto glass, improving repair strength. Many diy windshield repair kit options rely on this method for lasting results.

UV light activates the adhesive in the resin, making repairs stable and clear. Using a glass repair kit with ultraviolet curing reduces waiting time. It helps stop chips or cracks from spreading. Next, learn about the specific Benefits of ultraviolet light for resin hardening.
Benefits of ultraviolet light for resin hardening
- UV exposure ensures the repair kit resin fully cures, maximizing chip strength in automotive glass repair kit use.
- Ultraviolet light speeds up adhesive bonding, allowing glass repair kit users to finish repairs faster.
- Controlled UV curing minimizes air bubbles in the resin, improving windshield clarity after repair.
- Using a diy windshield repair kit with UV hardening helps prevent moisture from weakening the bond in the windshield crack repair process.
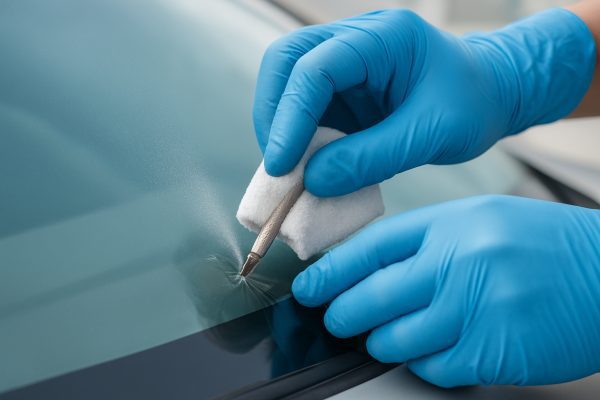
Preparing Auto Glass Surface with Cleaner and Razor Tools
Preparing the glass is essential for any windshield repair kit. Use a cleaner to remove dirt and oil. Razor tools help clear away loose glass and debris. Clean surfaces allow the resin or filler to bond properly. This step supports a strong, lasting automotive glass repair kit result.
A razor blade can scrape away chips or residue before repair. Clean the windshield with an auto glass cleaner, then dry it thoroughly. Removing moisture, dust, and oil helps the adhesive bond. These actions prevent bubbles or weak spots in your car windshield repair kit outcome. Next, review effective cleaning and prepping techniques before repair.
Effective cleaning and prepping techniques before repair
- Use a microfiber cloth to wipe the windshield after applying auto glass cleaner for optimal resin adhesion.
- Inspect the chip or crack with a magnifier to ensure no moisture or dust remains before using the windshield repair kit.
- Gently tap out any loose glass fragments with the tip of the injector tool prior to starting the repair process.
- Allow the automotive glass repair kit area to air dry completely to prevent trapped water from weakening the adhesive bond.
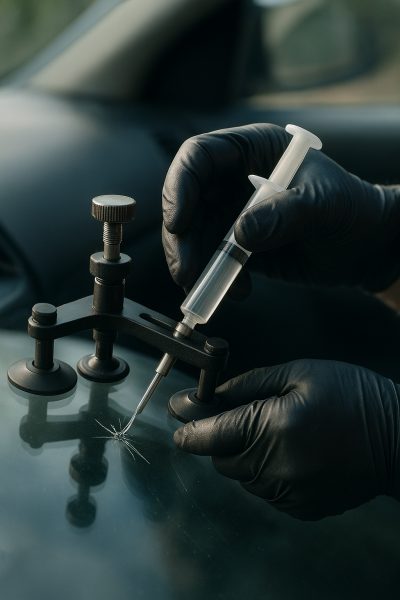
Applying Pressure with Plunger, Bridge, and Suction Cup
A windshield repair kit uses tools like a plunger, bridge, and suction cup. These help force resin or filler into a chip or crack. Applying steady pressure with these tools can make auto glass repairs more effective and long-lasting.
Proper use of the bridge tool keeps the injector steady over the damaged area. The plunger creates pressure, allowing the resin to reach deep into cracks. Suction cups stabilize the kit for even pressure. Mastering these steps is key for success and leads into Proper tool use for optimal resin injection results.
Proper tool use for optimal resin injection results
- Align the bridge tool directly over the windshield chip to ensure precise resin flow from the auto glass repair kit.
- Maintain steady pressure with the plunger or syringe so the adhesive fully penetrates cracks in the glass.
- Secure the suction cup firmly to the windshield for stable injection and even filler distribution during repair.
- Release and reapply pressure as directed by the repair kit instructions to eliminate trapped air bubbles in the resin.
Managing Chip Diameter and Crack Length During Repair
Managing chip diameter and crack length is crucial when using a windshield repair kit. Most auto glass repair kit options work best for small chips and short cracks. Repairing large damage can reduce safety. Always check your vehicle windshield repair kit instructions for size limits.
Chips larger than a quarter or cracks longer than 6 inches often need professional repair. Attempting to fix big damage with a diy windshield repair kit may fail. Resin and injector tools are less effective on long cracks. Up next, see how Assessing damage size for safe and effective repair helps guide your decision.
Assessing damage size for safe and effective repair
- Measure the chip diameter with a ruler before using any auto glass repair kit.
- Inspect the crack length to confirm it falls within the safe range for your chosen windshield repair kit.
- Evaluate chip shape and depth, as some glass repair kit tools work best on shallow or circular damage.
- Check that the affected area is clear of moisture and debris before applying resin or adhesive with the injector.
Ensuring Adhesive Strength and Moisture Resistance in Repairs
Achieving strong adhesive bonds is crucial in any windshield repair kit. The resin must stick tightly to the windshield and resist water. Proper sealing prevents moisture from entering the chip or crack. This protects the automotive glass repair kit results from future weather damage.
Using a car windshield repair kit on a clean, dry surface improves glue strength. UV curing hardens the filler, locking out water and dirt. Many auto glass repair kit options include curing strips for added seal. Next, review the main Factors affecting bond durability and weather protection.
Factors affecting bond durability and weather protection
- Using a windshield crack repair kit in optimal temperature ranges helps the adhesive cure evenly and resist weather changes.
- The quality of resin and filler in an auto glass repair kit impacts long-term moisture resistance and bond durability.
- Properly sealed edges with a glass repair kit prevent water intrusion that could weaken the adhesive in vehicle windshields.
- Uniform pressure from injector tools during repair ensures the glue and liquid resin fill all chip depths for maximum strength.
Troubleshooting Resin Flow, Air Bubbles, and Injector Issues
Resin flow issues and trapped air bubbles are common when using a windshield repair kit. Problems with the injector tool can prevent adhesive from reaching the crack. These challenges affect the final strength and clarity of your auto glass repair kit results.
Air bubbles often occur if the injector or syringe is not aligned properly. Resin may leak if the plunger is loose or the suction cup bridge fails. Many diy windshield repair kit users face these obstacles. Learn how to address these with the upcoming tips in Common problems and solutions during kit application.
Common problems and solutions during kit application
- Resin may fail to penetrate a deep chip if the syringe is not pressed firmly during windshield crack repair kit use.
- Air pockets can become trapped if the auto glass repair kit injector is not slowly released while applying the liquid filler.
- Uneven pressure from the plunger tool can cause adhesive leaks in the car windshield repair kit process.
- Using the glass repair kit in cold temperatures may slow resin flow and reduce proper bonding to the windshield.
Safety Guidelines for Liquid Resin, Gloves, and Ventilation
Using a windshield repair kit involves handling liquid resin and chemical adhesives. Always wear gloves when working with any auto glass repair kit. Ensure your workspace is well-ventilated to avoid breathing fumes. Protect skin and eyes from resin contact during the vehicle windshield repair process.
Liquid resin in a diy windshield repair kit can irritate skin or eyes. Open windows or use a fan to keep air moving. Dispose of used gloves and curing strips properly after glass repair kit use. For safer results, follow Essential safety steps for handling repair kit chemicals.
Essential safety steps for handling repair kit chemicals
- Store your auto glass repair kit and bottles of resin away from heat or direct sunlight to prevent unwanted curing.
- Always keep the windshield crack repair kit out of reach of children and pets due to hazardous liquid and adhesive.
- Use disposable gloves when handling glass repair kit chemicals to avoid skin contact with the filler or glue.
- Clean any spills of resin or fluid immediately from tools and surfaces to prevent damage to your car interior.
Maintaining Windshield Clarity with Filler and Polishing Tools
Maintaining windshield clarity depends on using the right filler and polishing tools. A quality car windshield repair kit can help restore smoothness. Resin fills chips, while polishing removes excess. These steps improve visibility and keep your auto glass looking clean.
Use polishing pads or a razor blade to level dried resin. Buffing removes haze from the glass surface. Many diy windshield repair kit options include tools to finish repairs. Proper filler and tool use prevent streaks. Next, discover Tips for a clear, smooth finish after repair.
Tips for a clear, smooth finish after repair
- Gently buff the cured resin with a microfiber cloth to enhance glass clarity after using your auto glass repair kit.
- Remove any leftover adhesive with the included razor tool to keep the windshield surface smooth.
- Apply light pressure when polishing the repaired area to avoid scratching the windshield or creating haze.
- Inspect the chip repair under natural light to confirm the filler blends with the surrounding vehicle windshield.
Long-Term Care for Automotive Windshield and Repair Kit
Long-term care helps keep your windshield and repair kit effective. Regular checks prevent small chips from turning into large cracks. Using a car windshield repair kit promptly can extend the life of your auto glass and reduce future repair costs.
Store your diy windshield repair kit in a cool, dry place. Protect resin bottles, injector tools, and curing strips from sunlight and moisture. Inspect your vehicle windshield for new chips often. For best results, follow ongoing maintenance and storage recommendations for kits to ensure readiness and long-lasting repairs.
Ongoing maintenance and storage recommendations for kits
- Keep your windshield repair kit and resin bottles in a sealed container to prevent air and moisture exposure.
- Store glass repair kit tools like the injector and syringe separately to avoid adhesive residue buildup.
- Place your car windshield repair kit away from direct sunlight to protect UV curing components and filler quality.
- Regularly check the auto glass repair kit for expired liquid or damaged tools before your next repair.
Final Thoughts:
A windshield repair kit offers a practical, cost-effective solution for addressing minor chips and cracks before they spread, helping drivers extend the life of their automotive glass. By following proper steps and using quality resin and injector tools, consumers can achieve durable results with most diy windshield repair kit options. For best outcomes, always assess chip diameter and crack length, and prioritize safety during the repair process. If your damage is suitable, consider using an auto glass repair kit today to protect your windshield and maintain clear visibility on the road.
Frequently Asked Questions (FAQs)
What types of chips and cracks can a windshield repair kit fix?1
Answer: A windshield repair kit fixes small chips and short cracks in auto glass. It works best on bullseye, star, and combo chips. Use the kit for vehicle windshield repair, not long cracks. Resin and injector tools fill damage under 6 inches. Always check the repair kit instructions for chip diameter limits.
How does ultraviolet (UV) curing improve the effectiveness of a windshield repair kit?2
Answer: Ultraviolet curing hardens the resin quickly in the windshield repair kit. UV light bonds the filler to the auto glass surface. This process makes the repair strong and durable. The kit’s adhesive forms a clear, lasting seal. UV curing also speeds up vehicle windshield repair and reduces waiting time.
What steps should be taken to properly clean and prepare the windshield before using a repair kit?3
Answer: Clean the vehicle windshield with auto glass cleaner and a microfiber cloth. Remove dust, oil, and moisture using the razor tool. Inspect chip diameter and crack length carefully. Let the area dry before using the windshield repair kit. Proper cleaning helps the resin and adhesive bond in the kit.
How do you use the injector, bridge, and suction cup tools to apply resin during windshield repair?4
Answer: Attach the bridge tool over the chip on the auto glass. Insert the injector or syringe into the bridge. Use the plunger to apply pressure and inject resin. The suction cup keeps the kit stable during repair. Even resin flow fills the windshield crack, chip, or filler area.
What is the maximum chip diameter or crack length that can be safely repaired with a kit?5
Answer: Most windshield repair kit versions fix chips under one inch diameter. Cracks must be less than six inches long for safe repair. Use the kit only on laminated auto glass. Do not attempt large or edge damage. Check the repair kit instructions for chip and crack size limits.
How can you prevent air bubbles and ensure even resin flow when using a windshield repair kit?6
Answer: Align the bridge tool precisely over the chip or crack. Inject resin slowly using the syringe or plunger. Release and reapply pressure as directed in the kit. This forces out air bubbles. Even pressure ensures the adhesive and filler reach all chip depths on auto glass.
Are there any safety precautions to follow when handling resin and chemicals in a windshield repair kit?7
Answer: Always wear gloves when handling resin or filler in the kit. Work in a well-ventilated area during vehicle windshield repair. Keep the auto glass repair kit away from children and pets. Store bottles and tools away from heat and sunlight. Clean spills immediately to avoid skin or eye contact.
How do you maintain windshield clarity and durability after completing a repair with a kit?8
Answer: Buff the cured resin gently with a microfiber cloth for clarity. Remove excess adhesive using the razor tool included in the kit. Inspect the auto glass under natural light for smoothness. Store the windshield repair kit in a cool, dry place. Regularly check for new chips or cracks on vehicle windshields.
Last Updated on December 20, 2025 by msj484
DISCLAIMER (IMPORTANT): This information (including all text, images, audio, or other formats on FamilyHype.com) is not intended to be a substitute for informed professional advice, diagnosis, endorsement or treatment. You should not take any action or avoid taking action without consulting a qualified professional. Always seek the advice of your physician or other qualified health provider with any questions about medical conditions. Do not disregard professional medical advice or delay seeking advice or treatment because of something you have read here a FamilyHype.com.