
If you’ve ever marveled at the sleek design of a skateboard and wondered if you could build your board, this article is here to tell you – yes, you can make your own! With some basic carving skills, a bit of creativity, and our comprehensive guide, we’ll help you build a unique and beautiful wooden DIY board at home.
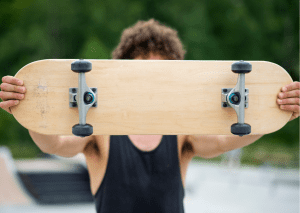
From designing the board shape to choosing the finish, you have the chance to build one and pour love and attention into every detail of the board. And when it’s done, this board is not just any board you can see—it’s YOUR creation that reflects your unique style and effort. Each of these components requires precise measurements, quality materials, and a thoughtful design for a successful skateboard. Investing in high-quality woods, such as aluminum trucks and polyurethane wheels. Along with the right tools and techniques, DIY skateboards can be an exciting and rewarding skate experience.
Create Skateboards From Home
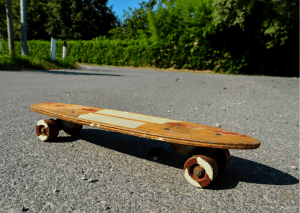
Making your skateboards out of wood gives you the freedom to choose the components that will make up your skate, from the size of the deck to the hardness of the wheels. Crafting DIY skateboard made of wood is not only a great way to save money, but it is also a rewarding experience that can leave you with a truly one-of-a-kind skate. Remember, regular maintenance is key to ensuring your board’s longevity and durability. This is especially important when you have built the skateboards yourself.
DIY Preparation Ideas
Gathering Your Materials
Before you embark on the thrilling adventure of crafting your wood skateboard, you’ll need to gather some essential materials that’ll help you realize your vision. Material sourcing is key in this process, especially the wood selection. Choose high-quality wood for increased durability and superior performance.
Additionally, make sure to select the right kind of wood for your skateboard, such as maple, oak, birch, or poplar. With all the key ingredients in hand, we’re ready to move forward on our journey toward designing our skateboards – an exciting stage where creativity and craftsmanship come together.
Once you’ve assembled all the materials, you can start crafting your skateboard. Your creativity and craftsmanship will be the key components in your journey to making the perfect skateboard.
Now that you know the essential materials required to make your skateboard, let your creativity and passion take the wheel!
Designing Your Board
Now that we’ve gathered all our materials, it’s time to dive into the exciting part – designing our skateboard! Before making the first cut, determining the shape and size of your skate is a vital step, as it affects maneuverability and comfort.
In designing your skate, incorporating tools like a truck hole layout ruler, glue roller bottle, and an edge scraper is essential for precision and quality. Utilizing lust varnish tools and an edge jointing sled ensures a smooth finish, while a foam form aids in shaping. Next, we’ll create a detailed blueprint that will serve as our roadmap throughout the making process, ensuring accuracy and precision in every cut and screw.
Determining The Shape And Size
DIY skateboarding is an incredible way to express yourself and craft your own unique style. From determining the shape and size of your skate to the perfect deck aesthetics that best suit your riding style, it is key to consider the length, width, and other details of your skate.
Creating A Quality Blueprint
Creating a Blueprint is a way to express yourself and bring your ideas to life. We’re thrilled to provide you with the tools and resources necessary to create your wood skate vision.
Drawing up your blueprint is like painting a picture of your dream ride, with every detail carefully planned and measured to guarantee an impressive execution on the pavement. Blueprint interpretation is crucial here: it sets our imagination free, guides us in material selection, and brings joy as we see our envisioned skate take shape.
We want to encourage our readers to be creative when crafting a skateboard, from the design and shape of the deck to the trucks and wheels. This process requires attention to detail and patience, but it’s worth it when you get to see your vision come to life.
Now, with this design in hand, we’re ready to bring this skate to life.
Constructing Boards
We understand the importance of family and the joy of being able to craft something with your own hands. That’s why we’re pleased to present this simple guide for constructing your wooden skate from scratch!
Safety should always be your top priority when taking on such a project, so make sure you have the right protective gear and tools. With a keen eye for detail, you can turn your blueprint into a robust and stylish skate that will last for years to come.
Creating a board from wood typically involves Canadian maple, renowned for its sturdiness, which is cut using a circular saw to ensure a tight turning radius; the wood must lay flat as several pieces are pressed together to form a cool, aerodynamic line with a thick enough profile to withstand the wear and tear from years ago; precise cuts shape the edges, removing half the excess to create smooth corners and a functional tip.
In this section, we’ll focus on assembling the skateboard, making sure every part complements each other perfectly. Skateboards are a great way to get around, and with a little effort and knowledge, you can make one yourself that you’ll be proud to ride.
Assembling Deck Parts
Ready to roll up your sleeves and dive into the exciting process of assembling your very own custom skateboard?
When it comes to selecting the wheels, you’ll want to consider the type of terrain, the speed, and the control you need. Make sure you use the correct tools to ensure the components are securely fastened for maximum stability. Remember, patience is key in this process. Skateboarding involves a lot more than just the skateboard itself – there are other components, like trucks, wheels, and hardware, that play an important role in the assembly.
Now, let’s shift gears and focus on adding those essential finishing touches. We hope you enjoy the process of making your skateboard and would love to hear about your experience with it!
Finishing Touches
Now that we’ve assembled our skateboard, it’s time to add some personality with the finishing touches. We’ll delve into the exciting world of painting and decorating your board, allowing you to express your unique style and creativity.
Then, we’ll guide you through applying grip tape for that important traction on your skateboard – a functional finish that also adds additional aesthetic appeal.
Painting And Decorating
We believe that skateboarding isn’t just a mode of transport—it’s an extension of your personality. So why not embrace your inner artist by painting and decorating your skateboard’s top and bottom with vibrant colors that come alive with every flip or turn?
Selecting the right hues, mastering stencil techniques, and applying grip tape are all crucial elements for achieving a unique design that reflects your character.
When selecting colors, it’s important to opt for shades that truly stand out. When using stencils, practice makes perfect—perfecting the technique will help you create the perfect design. And don’t forget to apply grip tape to ensure your skateboard is safe and secure for use.
Applying Grip Tape
Slapping on some grip tape is the final step to make sure your skateboard not only looks sharp but also safe and ready for action.
There are various grip tape alternatives you can explore, each with different tape application techniques. We’ll guide you through the process, ensuring optimum traction and performance for your ride.
Skateboard Maintenance Ideas And Care Tips
Caring for your DIY skateboard is an act of love that deepens your connection to this handmade marvel and is essential for maintaining its functionality and optimal performance. Here are some key steps to follow for proper maintenance:
- Utilize gentle cleaning skate techniques of the wooden skateboard to avoid damaging the material.
- Weather-proof your wooden skateboard for protection.
- Inspect any damage on your wooden skateboard promptly.
Proper maintenance of your custom board will ensure you’ll be able to ride, grind, and have fun at the skate parks for years to come.
Conclusion
We’ve shown you how to craft DIY decks from scratch. Not only does this save money, but the satisfaction you can get from creating something with your own hands is unbeatable.
Remember, regular maintenance is key to ensuring your board’s longevity. We hope that this guide has been helpful and inspiring – now it’s time to create your custom ride! Making your own board gives you the freedom to choose the components that will make up your board, from the size of the deck to the hardness of the wheels.
Crafting DIY skateboards made of wood is not only a great way to save money, but it is also a rewarding experience that can leave you with a truly one-of-a-kind board. With the right tools and materials, you can create a board that is tailored to your riding style, from street to park to cruising.
We hope you’ll use this guide as a springboard to create your custom ride – it’s the perfect way to get out there and start skateboarding!
Frequently Asked Questions (FAQs):
What Are The Materials That Should I Use To Make My Board?
To make it, you should use high-quality skateboard decks made from maple wood, which is a popular choice for its strength and durability. You also need wood glue and a vacuum bag. The process involves using wood glue to laminate several thin layers of maple together to achieve the desired thickness for the deck.
Once the layers are glued, they are pressed into shape using mold and foam molds to create the final thickness of the entire board. This whole process is common in the manufacturing of skateboards, with renowned skate companies, particularly in places like Orange County, using band saws to cut the decks to their final shape and size.
How Many Layers Of Wood Are In A Skateboard?
In a typical deck, there are usually 7 to 9 layers of wood, known as “plys” or “veneers.” These thin layers are usually made of high-quality maple wood, which is strong and flexible, providing the necessary properties for a durable skate deck. The layers are glued together and then pressed into shape using a custom vacuum press, creating a sturdy and reliable skate deck that can withstand the rigors of skateboarding.
How To Build Your Deck From Your Home?
To build your skateboard from wood, start by obtaining a high-quality deck from a skate shop or online store. If you want a custom design, you can use spray paint to personalize the deck’s appearance. Next, attach the grip tape to the top of the deck, and use a utility knife to trim off any excess. Then, add the trucks, wheels, and bearings to complete your new board, and you’ll have a fully functional board ready to ride or display on a rack.
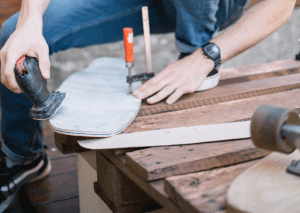
How To Make A Skateboard From Wood At Home?
To make a wood skateboard at home, start by obtaining a high-quality skateboard deck from a skate shop or online store. If you want to make your deck, you can use a belt sander to shape and sand the wood into the desired skateboard shape. Apply grip tape to the top of the deck, and then add trucks, wheels, and bearings to complete your homemade skateboard, allowing you to ride a custom board with more air and style.
Is Plywood Good For Building Boards That Professionals Can Use?
Plywood can be a suitable material for making a skateboard, especially if you use high-quality plywood from home improvement stores. However, not all plywood is ideal for skateboards, as most boards require a specific type of plywood with the right thickness and composition. When making a skateboard, ensure the plywood has a smooth surface and sturdy edge to create a durable and responsive deck.
What Plywood Or Wood To Use For Building Skateboards?
For skateboarding, the preferred type of plywood is high-quality maple veneer plywood. This type of plywood is specifically made for skateboard decks and is known for its strength, durability, and flexibility. The maple veneer layers are pressed and sealed together using a vacuum bag, ensuring a solid and reliable skateboard deck capable of withstanding all the air and impact while skateboarding.
What Glue Is Used For The Boards?
The most common skate glue is epoxy or resin-based adhesive. This type of adhesive is strong and durable, ensuring that the veneer layers of the skateboard deck stick together firmly. After applying the adhesive, the layers of veneer are pressed together and sealed to create a solid and reliable skateboard deck that can withstand the rigors of skateboarding.
How Many Bushings Do The Boards Need?
- A skateboard typically requires four bushings, two for each truck. The bushings are located on the kingpin, providing cushion and allowing the trucks to turn smoothly and responsively. The rider can adjust the tightness or looseness of the bushings to customize the skateboard’s turning characteristics according to their preference and riding style.
What Is The Wood On A Skateboard Called?
- The wood on a skateboard is called the “skateboard deck.” It is the flat wood that serves as the main body of the wood skateboard. The skateboard deck wood is typically made from high-quality maple wood and comes in various shapes and sizes, providing the foundation for the rider’s feet while skateboarding.
What Is The Top Layer Of A Skateboard Called?
- The top layer of a skateboard is called the “grip tape.” It is a rough, sandpaper-like material applied to the top surface of the skateboard deck to provide traction and grip for the rider’s feet while skateboarding. Applying grip tape is typically done using a paint roller to ensure even and secure adhesion to the deck.
Last Updated on June 4, 2024 by Mary Cimeni
DISCLAIMER (IMPORTANT): This information (including all text, images, audio, or other formats on FamilyHype.com) is not intended to be a substitute for informed professional advice, diagnosis, endorsement or treatment. You should not take any action or avoid taking action without consulting a qualified professional. Always seek the advice of your physician or other qualified health provider with any questions about medical conditions. Do not disregard professional medical advice or delay seeking advice or treatment because of something you have read here a FamilyHype.com.