
The best gifts are homemade. But what if we told you that your next project is to build a skateboard swing that surprises, delights your kids, and promotes their physical activity and outdoor play? Welcome, fellow parents, and build your skateboard swing!
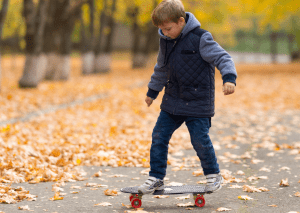
Creating a skateboard swing is an excellent way to get your kids active and enjoying the great outdoors. They’ll be able to swoosh, glide, and do tricks – and who knows, maybe even invent a few of their own! With our detailed instructions, you can make sure that the skateboard you make at home is not only the best – but also safe and secure.
So let’s roll up our sleeves together and create something truly special for our children – an exciting playground right at home filled with laughter, joyous screams of delight, and memories they’ll cherish forever.
Key Takeaways
In this article, we delve into the world of actual skateboarding swings. We take you on a journey of creating it together with your kids, ensuring that every loose end is addressed along the way. As we discuss the safe spots and tips you must practice as you assemble it, one hole at a time, we will make sure that it is safe and secure.
Regular maintenance and inspections are critical, so give it a weekly check to keep it in tip-top condition, and attached securely. Safety is an absolute must all the time – so make sure to buy a high-quality skateboard and take the necessary precautions. Make sure your kids have the best experience, whether they’re swinging from the trees or enjoying the DIY skateboard swing in the comfort of your garage.
Building A DIY Skateboard Seesaw For Kids
Build Swing
Preparing The Board
It’s time to get started and prep your old skateboard for its new role as an incredible, unique play structure. We know that customization is essential for maximizing safety while still keeping that classic vibe. That’s why we’ll discuss skateboard durability and make sure to make the best choices.
Now that the skateboard is ready to go, let’s dive into assembling!

Skateboard Swings
Assemble The Swing
Now that we’ve got our skateboard prepared, it’s time to get into the exciting part – assembling the swing!
We’ll be focusing on two essential tasks: attaching the ropes and securing the skateboard. Don’t worry, these steps can sound a bit tricky but trust us, they’re simpler than you think and we’re here to guide you through every step of the process.
Attaching The Rope
To ensure the utmost safety for our kids as they enjoy the play set we’ll be making, it’s important to attach the ropes securely and appropriately.
Beforehand, evaluate the rope’s strength to ensure it can handle the skateboard and the child’s weight.
Once the ropes are tied tight, the skateboard must also be firmly secured! We’re not only focused on creating fun times but also on providing a safe environment for our kids.
Securing The Skateboard
Securing the skateboard properly is the next crucial step for those eager young adventurers in your life, and FamilyHype is here to provide guidance. We’ll need to consider skateboard decoration and durability; these aspects are key when it comes to safety.
- Skateboard Decoration:
- Use non-slip grip tape for improved traction and safety of skateboard swing.
- Let kids personalize the skateboard swing with stickers, decals, and artwork.
- Skateboard Swing Durability:
- Ensure secure knots when tying the rope.
- Check ropes regularly for fraying or wear.
Remember, location matters too. Finding the right spot to skateboard is essential for a successful and safe experience. We want to ensure your kids get the best out of their skateboarding journey.
Skateboard Swing
Choosing The Right Spot
Let’s start our adventure by finding the perfect spot!
Tree health is essential; we need to make sure the branch is strong and healthy.
Aesthetics are also important; should blend seamlessly into your backyard paradise.
Once we’ve got the ideal location, it’s time to move on to the next phase of our project: testing and adjusting the ride of our amazing creation! So, let’s get ready to create an awesome one that’ll give you and your family the ultimate thrill!
Testing And Adjusting The Skateboard Swing
Once you’ve got it all set up, it’s crucial to test and adjust it for a smooth, safe ride.
Give it a couple of dry runs to ensure durability and user comfort. Make any necessary adjustments to the ropes or seat. Perfecting this fun project is key to endless joy!
Having confirmed its reliability, let’s move forward and discuss how we can maintain it and ensure safety precautions are in place.
Maintenance And Safety Precautions
Keeping your new outdoor toy in tip-top shape and making sure everyone is safe is easy with the right precautions.
Regular inspections, including exercise, can help to identify any wear and tear early, reducing the chance of injury. Tighten any loose bolts with a screwdriver, check for any splinters or sharp edges, and make sure the rope is strong and secure. By taking these simple steps in parallel with your summer maintenance routine, we’re not just keeping your platform in excellent condition, but also prioritizing injury prevention.
As you maintain your skateboard during the summer, remember to prioritize safety.
Skateboard Swing
Conclusion
We hope you’ve had an informative time reading this article we’ve prepared.
It’s not just about the end product, but also the exciting journey of making it together with your kids! Always choose a secure spot so that you can ensure it’s always safe.
Regular checks and maintenance are key, so don’t forget to give it a weekly check-up. Enjoy this thrilling ride!
As we’ve mentioned, maintenance is crucial. It would help if you regularly inspected it every once in a while to ensure it’s in good condition.
This activity is sure to please your children, especially if you build a skateboard swing. We’d love to hear about your experiences in assembling this awesome skateboard swing and providing a fantastic tutorial for your kid. Don’t forget to keep an eye out for any old skateboard parts you can use, and make sure you have a drill bit and pin ready for the project.
Frequently Asked Questions (FAQs)
How Do You Create The Frame?
To build an A-frame for your cheap DIY project, start by finding a sturdy tree branch to serve as the main support. Use a drill to create holes in the branch, ensuring they are evenly spaced and secure. Then, attach the skateboard to the branch with strong ropes, creating a standing swing that provides fresh air and fun for small kids as they enjoy it in the great outdoors.
What Is The Perfect Knot For This?
The perfect knot is the “bowline” knot. To tie this knot, create a loop with the rope and pass the other end through the loop. Then, pull the rope through the loop to secure the knot tightly. The bowline knot provides a secure and reliable attachment point to the ground or support structure, ensuring a safe and enjoyable experience.
How Do You Use The Ramp For Boards?
To use a skateboarding ramp, gain some speed, approach the ramp at an angle, and as you reach the transition, bend your knees and use your body’s momentum to go up the ramp. As you reach the top, push down on the tail of the skateboard to lift the front wheels slightly and smoothly transition back down the ramp.
How Do You Flick The Board?
To flick a skateboard, place your front foot near the front bolts and your back foot on the tail. Pop the tail down while sliding your front foot forward and off the skateboard’s edge to initiate the flicking motion, causing the skateboard to flip. Practice the flicking technique with various tricks to achieve different skateboard maneuvers.
How Do You Use Skateboard?
To use this, first, ensure that it is securely built following proper DIY project guidelines, including drill holes for secure attachment. Once it has been safely constructed, kids can sit or stand on the skateboard and hold onto the ropes or handles while enjoying the swaying motion. It’s important to note that this play set is a safer alternative to the actual sport and should be used for play purposes only.
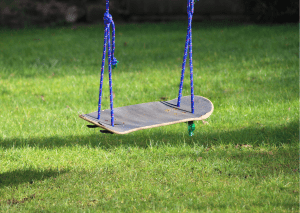
How To Make Rope Swing?
Making a rope version is a surprisingly easy DIY project. Start by finding a sturdy deck, then drill holes on each end of the deck to attach the ropes. Next, tie the ropes securely through the holes, creating a simple and fun rope play set that kids can enjoy outdoors.
What Kind Of Rope Swing Is Used?
The type of rope commonly used is typically strong and durable, such as nylon or polypropylene ropes. These ropes can withstand outdoor elements and provide secure support. When assembling, make sure to measure the necessary lengths of the rope based on the hanging height and the desired length for the edge to ensure a safe and enjoyable experience in the yard.
How To Make A Bar Swing?
To make a bar swing, start by gathering a sturdy wooden dowel and drilling a hole through its center. Thread a strong rope through the hole and tie knots on each end to secure it. For added safety, melt the ends of the rope with a lighter to prevent fraying. Hang the bar from a secure structure using the rope, and then it is ready for fun and imaginative play.
Is It Cheaper To Build Your Own Swing Set?
Assembling a DIY skateboard swing can be a cost-effective option compared to buying a pre-made one. DIY projects allow you to customize it according to your ideas and preferences, making it a more personalized and enjoyable experience for you and your family. By using your creativity and skills, you can save money and create a unique and fun play area in your backyard.
How Do You Make A Homemade Swing?
This could be a good idea for a homemade one. Start by cutting a skateboard deck in half to create the seat of the set. Then, attach strong ropes or chains to each end of the cut skateboard deck, ensuring they are securely fastened. Hang the finished result from a sturdy tree branch or a strong support structure, and you’ll have a fun and unique homemade swing for outdoor play.
Last Updated on June 5, 2024 by Inma Barquero
DISCLAIMER (IMPORTANT): This information (including all text, images, audio, or other formats on FamilyHype.com) is not intended to be a substitute for informed professional advice, diagnosis, endorsement or treatment. You should not take any action or avoid taking action without consulting a qualified professional. Always seek the advice of your physician or other qualified health provider with any questions about medical conditions. Do not disregard professional medical advice or delay seeking advice or treatment because of something you have read here a FamilyHype.com.