
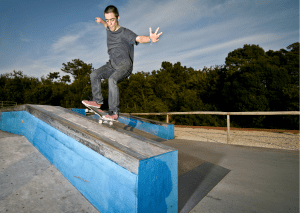
It is nice to know that you’ve chosen to embark on this journey with us, making your very own grind box. Skateboard riding is the sport that offers an opportunity for fun and creative expression, and we understand the importance of honing skills and perfecting your moves. Whether you’re an experienced rider looking to spice up your practice sessions or some beginner wanting to learn new tricks, this grind hamper project is perfect for you.
We understand that buying grind equipment can be expensive, so we’re here to guide you through constructing a durable and efficient grind hamper obstacle at home. It’s not just about saving money; it’s also about gaining the satisfaction of creating something with your hands that will help you grow as a boarder and serve the community.

Together, we’ll go through the process step by step, from gathering materials and tools like wood, screws, sandpaper, saws, and drills, to designing, constructing, and testing your box. We promise it’s simpler than most home improvement projects!
Key Takeaways
This article will help you make your own box and put it to the test! Before you get shredding, don’t forget to prioritize safety and practice. This is a popular sport that has different variations, such as street skating, bowl skating, and riding at skate parks. With your own, you can now take your skills to the next level and perfect your moves. Whether you’re a beginner or an experienced street rider, it’s mastering the basics is crucial for skateboarding. Here are some tips to build skateboard grind box!
Gathering The Materials And Tools
Before we dive into crafting your own obstacle, let’s make sure you’ve got all the essential materials and tools – it’s gonna be a fun ride!
We believe in reusing and serving our community sustainably. Recycling old materials can be a cost-effective strategy for sourcing the parts and components you need. From trucks to bushings and bearings, there are so many different parts and accessories you can use in your creation. If you want to make your skate box lighter, you’ll need to purchase more lightweight materials.
Now that we have everything ready, let’s smoothly roll into the next exciting phase of designing your skate box.
Designing Your DIY Slide Box
We understand the importance of this sport for families and their bonding experiences. That’s why we’re bringing you a guide to designing your own. Let’s consider the size and aesthetics of your boxes and start imagining the tricks you’ll be able to pull off with a custom-made obstacle right in your backyard! Take note of the width and length you want your skate box to be.
A larger skate box allows more room for creative maneuvers, while a sleek design adds style to your skate park. Riders can also use it to practice their stunts and tricks and to master their skills while having fun.
Now that we’ve covered design aspects, let’s prepare our tools and materials as we move into constructing the frame of our awesome new addition.
Build The Skateboard’s Slide Rail Frame
Gathered all the tools and materials? Great, it’s time to roll up those sleeves and dive into constructing the frame of our exciting project. Durability is vital for safety precautions, so we’ll ensure strong joints and secure fastenings. Remember, meticulousness now will provide a solid foundation. Done right? Fantastic! Now, we seamlessly transition into the next phase of this endeavor: attaching the surface.
Attaching The Surface To Your DIY Skateboard’s Slide Rail
Now that we’ve successfully constructed the frame, it’s time to focus on attaching the surface. Selecting the right surface material is crucial as it impacts your skating experience and longevity. We’ll guide you through choosing an apt material and securely fixing it to the frame, ensuring a sturdy and smooth platform for all your tricks.
Choosing The Materials For The Box
Choosing the right surface material for your skate box is essential for building an optimal riding experience. We know it’s not just about aesthetics but balancing durability and smoothness for the best performance.
When selecting your surface, consider the following:
- Surface longevity: Opt for skate materials that can withstand skateboard grind and skateboard slide tricks. It will help you with your skateboard grind performance.
- Material aesthetics: Select skate materials that can enhance your skateboard grind experience.
Remember, making the right choice of surface material is key to having an enjoyable ride. Now, let’s look into how you can attach the chosen surface to the frame.
Securing The Surface To The Longboard Box’s Frame
After you build the frame, securing the surface to the frame is an essential step in building a safe and reliable obstacle. We understand the importance of building a solid foundation that can withstand the wear and tear of performing tricks.
To do so, we recommend using stability enhancements such as screws, brackets, or even weatherproofing techniques to reinforce the bottom of the skate box and the sides of the box. Once your surface is securely fastened, you can add the metal edge to further enhance your skate box. It’s important to take the time to properly secure the top and bottom layers to the frame and to make sure it’s safe to ride.
Adding The Metal Edge
It’s time to finish your skate box and give it a professional touch with a metal edge. This article recommends choosing a robust, weather-resistant option to ensure your tricks are seamless and your skate box is durable.
We suggest ensuring the metal edge is fitted snugly and evenly distributed for the best results. With this accomplished, you’re ready to start testing your skate box and experiencing the thrill of mastering your own tricks.
This can be classified as a do-it-yourself project. But like most do-it-yourself projects, this requires handyman skills, creativity, and precision. Moreover, make sure to use the right set of tools, take your time in building the design, and do not skimp on the safety of your project.
Use power tools and special tools to ensure precision and safety, such as rivets and drills for the best results. Ultimately, with the metal edge installed, you’ll be able to enjoy the thrill of riding with your own custom obstacle.
Finalizing And Testing Your Slide Rail
After weeks of hard work and dedication, it’s time to put the fruits of your labor to the test and revel in the satisfaction of mastering new tricks on a box you crafted with your own hands.

Don’t forget that proper maintenance is key for a ledge to last, so be sure to take care of it! It’s time to enjoy and appreciate the grind box we created together – let’s get riding!
Conclusion
We’ve done it, all thanks to our hard work and dedication! We’ve finally created our own box, and now it’s time to have some fun testing out some moves. Before you ride away, remember that safety is always the top priority, and practice makes perfect.
Skateboarding is a popular sport that’s enjoyed by many, and this project is a great way to take your skills to the next level. From skate parks to street skating, it’s important to master the basics and perfect your moves. So grab your board and get riding!
Frequently Asked Questions (FAQs)
The Process In Making A Board’s Slide Rail?
To make your own grind box, you will need to buy a sheet of plywood from the hardware store to create the main structure of the box and a sturdy frame to support it. Additionally, you’ll need coping material (metal or PVC pipes) for the edges to allow for smoother tricks on the ledge.
How To Build A Ramp For A Board?
To make your own ramp or grind box, start by cutting pressure-treated lumber for the frame and middle legs. Attach the angle iron to the edges of the ramp for smoother riding on the ground, and use a drill bit to create holes for the four screws that will secure the components together. Then, place a sheet of plywood on top to create the ledge, and your ramp will be ready for use.
What Is A Slide Rail?
A grind box is a type of obstacle used for practicing tricks. It is typically made from pressure-treated lumber and features a smooth surface on the top of the box to allow riders to slide along its length. To make one, people often visit a hardware store to purchase the necessary materials and pre-drill holes with a drill bit for easy assembly using screws.
How Do You Slide A Board Rail?
To grind a rail, first, approach the rail with enough speed and pop the skateboard as you reach the rail. Position your trucks over the rail, and using the pre-drill holes in your box as a guide, use the box lighter and pressure-treated lumber to make a rail and place it on top, making sure it is securely attached.
What Is The Angle Of A Board Ramp?
The angle of a ramp, also known as the ramp’s incline, can vary depending on its design and purpose. It is typically measured using a tape measure and can range from around 10 to 30 degrees, with the exact angle determined by the length and height of the last piece of pressure-treated lumber used to construct the ramp. Ensuring the ramp’s angle is appropriate is crucial for providing a smooth and enjoyable ride while maintaining safety for riders.
How Many Layers Of Plywood Do I Need For A Skate Ramp?
To create your own ramp, you typically need two layers of plywood for the ramp’s surface. The pressure-treated lumber forms the middle structure of the ramp, and the two layers of plywood are used to create a smooth and durable surface for riders to grind on. Pre-drilling holes in the plywood and using screws to attach it to the pressure-treated lumber will ensure a sturdy and secure construction for the ramp.
What Is The Easiest Skate Slide?
The easiest grind on a rail for beginners is often the 50-50. To perform this, position the trucks over the rail’s top piece and grind along the rail with both trucks on it, forming a “50-50” shape. The 50-50 is a basic and fundamental trick that provides a good starting point for riders to practice their rail riding skills.
How Do You Attach Coping To A Grind Box?
To attach the coping, start by cutting the steel coping to the desired length using a saw. Position the coping on the top edge of the grind box and align it properly. Use screws to secure the steel coping to the skate box, ensuring a strong and stable attachment that allows riders to grind smoothly.
How Thick Should Plywood Be For Boards?
The plywood used for the surface should be relatively thick to provide durability and support. A recommended thickness is typically around 3/4 inch or 18mm. This thickness ensures that the plywood can withstand the impact and pressure from tricks while offering a smooth surface for sliding and grinding. Pre-drilling holes and using screws to attach the plywood to the pressure-treated lumber in the last step will secure the sheet in place, completing the construction.
What Is The Best Plywood To Skate On?
The best plywood to ride on is typically high-quality, smooth, and durable plywood with a thickness of around 3/4 inch or 18mm. Pressure-treated lumber is commonly used for the frame and structure of the ramp or box, and pre-drilling holes in the plywood before attaching it with screws ensures a secure and smooth surface. Additionally, painting the plywood with a ride-friendly paint can enhance its performance and appearance, making it the ideal choice for a smooth and enjoyable experience.
Last Updated on June 8, 2024 by Mary Cimeni
DISCLAIMER (IMPORTANT): This information (including all text, images, audio, or other formats on FamilyHype.com) is not intended to be a substitute for informed professional advice, diagnosis, endorsement or treatment. You should not take any action or avoid taking action without consulting a qualified professional. Always seek the advice of your physician or other qualified health provider with any questions about medical conditions. Do not disregard professional medical advice or delay seeking advice or treatment because of something you have read here a FamilyHype.com.