
We’ve all been there. The skateboard that once gleamed with newness and promise is now a shell of its former self, worn down by countless rides and perhaps a few too many spills. But don’t despair! We have some DIY skate restoration tips! With some elbow grease and a little patience, we can breathe new life back into that old skateboard, rekindling joy from something that may seem, at first glance, beyond saving.
We’ll guide you step-by-step from assessing the damage to reassembling your deck for board riding around the block or maybe even the park! So, let’s get started with the process of reviving your deck and ensuring it’s ready to handle all the “stuff” you throw its way!
So, let’s roll up our sleeves together and bring back those cherished decks of old boards to their former glory. In a few easy steps, we can serve our loyal decks as they’ve served us throughout the years! Eventually, as you embark on your project, you’ll see your efforts transform your board into a work of art. The skateboard that you purchased years ago can still look brand new—it’s just a matter of giving it the right care and a fresh coat of paint or artwork to rejuvenate its appearance.
Key Takeaways
This article aims to cover the feeling of being overwhelmed by the prospect of restoring your old board’s decks back to good condition. With some patience and elbow grease, you can bring back the glory of your old boards. They are made up of multiple components – decks, trucks, wheels, bearings, grip tape, and hardware – and each one is important in the deck restoration process.
DIY Restore The Skateboard
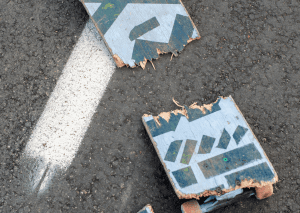
Assess Your Board
- Before you start the board repair process for the first time, it’s crucial for you to assess the condition of your board critically. Understanding its wear and tear can reveal a lot about your riding style and habits.
- Understanding its wear and tear can reveal a lot about your riding style and habits, but don’t worry, it’s not a big deal. To ensure that skateboard decks are in their best condition, it’s important to check for signs of wear and tear, such as chips, warps, or gouges. Additionally, make sure to look for any cracks, scratches, or dents that can compromise the durability.
Restoring a skateboard deck is an art that truly embodies the DIY spirit, requiring both effort and creativity. One of the most exciting parts of this process is screen printing your own design onto the deck. This technique not only allows you to personalize your skateboard but also adds a professional touch to your restoration project. With a bit of patience and the right supplies, including a screen printing kit, you’ll be able to create a unique and eye-catching design that makes your skateboard stand out.
Gather The Supplies For The DIY Repairing Of Longboard
- We understand that a successful do-it-yourself makeover project requires the right tools and materials. To help you stay within your budget, we recommend affordable yet effective materials such as sandpaper, wood filler, varnish, paints, and wood glue.
- Using affordable materials can be an edge, allowing you to complete your board makeover project within budget while achieving outstanding results. When gathering supplies, be sure to keep in mind the love you have for your board surface and the service you are providing to others.
Now, let’s move on to the next step: thoroughly cleaning your board surface!
Clean Your Board
In the process of deck restoration, cleaning is crucial. You can do this easily, as it doesn’t take a lot of effort to find the necessary tools for cleaning.
- It serves not only to enhance its appearance but also as a mark of respect for this integral element. You are not just restoring the board but revitalizing the memories and experiences that come with it. Stain removal can reveal hidden artistry or blank board surfaces, evoke feelings of accomplishment, and ultimately give your board a new lease on life.
- The board surface can vary in terms of materials and sizes. The shape can also differ. The grip tape plays a vital role in providing traction and stability, while wheels are available in a range of colors and sizes to match different terrains and riding styles.
- To maintain the board surface in optimal condition, it’s essential to focus on their hygiene, ensuring they remain fuzz-free and well-protected from the elements.
- You can also hang them up on your wall when not in use to prevent damage.
Repairing Of The Damage Board
Notice cracks or dings on the board surfaces? Don’t panic! First, it’s important to peel off any old grip tape to prepare your skateboard deck for a fresh look and smooth slide. Then, inspect the damage to see what type of repair is necessary. Depending on the severity of the damage, you’ll need to use different repair techniques, including patching, sanding, and polishing. Once the repairs are complete, you can personalize your deck with screen printing to add your unique design, making your skateboard not only functional but also stylish.
How To Remove The Grip Tape From The Board
To remove grip tape from a longboard, heat it with a hairdryer, carefully peel it off, and clean any adhesive residue. This process allows you to assess any damage to the deck.
Once you’ve determined the right repair technique for your board, you can move on to making it look new with a refinish. The article recommends that you take your time and use quality materials to ensure the best results.
Refinishing Tips
Repairing the damage is just one side of the make-over. Once we’ve successfully repaired any damage to our board’s surfaces, it’s time for the fun part – refinishing! We’ll start by sanding and priming the surfaces to ensure a smooth finish, then move on to painting for a whole new look.
Lastly, we’ll seal everything up to protect our hard work and make our board last longer. Isn’t it exciting how with just a few steps, we can breathe new life into the old decks?
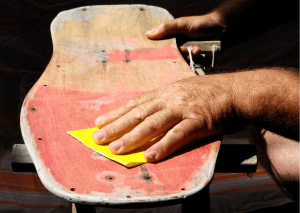
- Sanding And Priming
Now that we’ve removed all the old paint and grime, it’s time to sand the decks. This step is key to effective dust management, so you can create a smooth surface for painting. With the board now primed and ready, we can dive into the exciting world of painting and sealing to give a stunning finish.
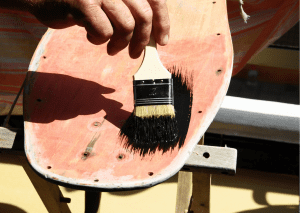
2. Painting And Sealing
It’s time to let your creativity shine as we delve into the process of painting and sealing. With the selection of board surfaces, trucks, wheels, and other parts, we can create a unique design that screams you. Opt for color combinations that echo your style and personality. Consider using screen printing to add intricate designs or logos to your deck for a truly personalized touch. When it’s already covered with paint, remember that aftercare is essential, so seal the deck properly to preserve its fresh new look, even when it gets wet.
Spray Paint Or Acrylic Paint?
When painting boards, the choice between spray paint and acrylic paint comes down to your desired finish and the level of detail you want to achieve. Spray paint offers a smooth, even finish and is great for larger areas, while acrylic paint allows for precision and intricate designs. For even more customization, consider incorporating screen printing to add detailed graphics or logos to your board. If you ever decide to repaint, you can even combine both methods for neat and customized results, but be sure to apply a clear sealant to protect your painted artwork and the deck.
Reassemble Your Board
- After a deck repair, assemble your board by cleaning components, installing bearings and trucks, adjusting tightness, applying grip tape if needed, and conducting a final inspection.
- Test ride for performance and fine-tune for a personalized setup.
- Enjoy your rejuvenated ride, completing the repair process.
After every piece of your board has been carefully restored, you’ll get the satisfaction of putting it all back together like a finely-tuned machine. We want to help you make this process enjoyable and successful. Below are some helpful tips:
- Take your time with wheel selection; make sure they match your skating style and provide the repair performance you need.
- Pay attention to truck adjustment for optimal control, maneuverability, and achieving the desired results in your repair project.
- Celebrate each successful step; through your own repairing efforts, you’re revitalizing a cherished item, and that’s an achievement to take pride in.
When it comes to it, high-quality components are essential. From the decks to the trucks, wheels, bearings, and truck bolts, every part must be carefully selected to ensure proper performance. Make sure you’re using the right size board accessories, especially if you’re using new trucks. Additionally, be sure to adjust the trucks to your desired level of control and maneuverability. A light touch and a keen eye for detail can make all the difference in your experience.
Restoring Skateboard Decks: Conclusion
Complete boards are more convenient, but the satisfaction of restoring the old deck from your first board is unmatched. We’ve shown you how to restore the decks of your board step by step, but don’t worry if it seems daunting.
- Remember, every scratch and scrape on your board holds a story—don’t be too keen on erasing them all! With some patience and elbow grease, we’re sure you can bring back the glory of your old board.
- From decks to trucks of boards, wheels to bearings, and grip tape to hardware, this project is all about the details.
- As you embark on this journey for the first time, keep in mind that the satisfaction and improved performance of your board that you’ll experience at the end of this project may inspire you to do more and take on further challenges.
The resources to restore your board are not hard to get if you wanted to. So, take a moment to appreciate the journey and the rest of your adventures. Don’t forget that adding a personal touch with screen printing can make your board truly unique. In the meantime, we wish you the best of luck in repairing your board! Good luck as you restore your board and make it as perfect as you want it to be.
Frequently Asked Questions:
Can I Sand Decks Of Skateboards By Hand?
Yes, you can sand the deck of the boards by hand using sandpaper. 80-grit sandpaper should suffice. Start by removing the old grip tape and cleaning it thoroughly. Then, use sandpaper to sand the surface of the deck, smoothing out any imperfections or rough areas. Sanding by hand allows you to have more control and precision over the process, helping you achieve the desired finish on your board surface.
How Is Repairing Of The Old Wheels Of The Board Achieved?
To restore the old wheels of your board, start by cleaning them thoroughly to remove dirt and debris. You can use a hardware store to find a suitable base coat or primer for the wheels. Then, apply spray paint in your desired color, ensuring even coverage and allowing it to dry completely before reinstalling the wheels. Additionally, you can use excess grip tape to add a fresh grip surface to the wheels, enhancing their performance and appearance.
How Do You Remake The Decks Of Old Boards?
To rejuvenate decks, start by removing the old grip tape using a razor blade. Clean board surfaces thoroughly to remove any dirt or debris. Then, apply a fresh layer of new grip tape to provide better traction and a fresh look. If the decks are old and worn, you can consider replacing them with a new board to ensure optimal performance and a more enjoyable boarding experience. Make yourself happy by enjoying your restoration process, choosing a cool color and background, and making it as creative as you can.
Is Sanding A Board Deck A Good Idea?
Sanding can be a good idea if you want to remove old graphics or paint from the decks and give them a fresh look. However, it’s essential to be careful not to apply too much heat with the heat gun, as it can damage the board. Once you’ve sanded the board surfaces and achieved the desired background, you can pull off the graphic, if any, and apply a new graphic to give the boards a customized appearance. Also, you must ensure that your skate deck’s wood can take it.
How To Make Deck Of The Board Last Longer?
Making your board last longer starts the moment you choose the wood for your initial build. Make sure that it’s a good kind of wood – one you can maintain easily. View it as an investment – this will make things easier for you. Many people find it helpful to watch a video on board selection and maintenance. If you’re at home and wanted to learn more, there are plenty of resources available online. Some guys even demonstrate how to build a board from scratch on concrete surfaces, which can be pretty informative and inspiring for anyone looking to create a durable and long-lasting skateboard.
How Do I Make The Wheels Of My Board White Again?
To make your wheels white again, you can use spray paint or acrylic paints to cover the surface of the wheels. First, remove any stickers or decals from the wheels and clean them thoroughly. Then, using a brush, apply a thin layer of white paint to the wheels, ensuring even coverage. Allow the paint to dry completely before reassembling the board, and you’ll have white wheels with a fresh look. It might take a somewhat long time, especially if you’ve used your board way too much. So be patient!
How To Fix Aging Board Decks?
Start by thoroughly cleaning the old board to remove dirt and grime. Next, if the graphic is fading or peeling, you can use paper and an image to create a new graphic. Apply the new graphic to the deck, and if the board is severely worn, you may consider replacing it with a new board to ensure a better experience.
Does WD40 Help Board Wheels?
WD-40 is not recommended for wheels. While it might offer temporary lubrication, it is not designed for use on board bearings. To maintain smooth and optimal bearing performance, use a dedicated board bearing lubricant, ensuring a smooth ride on your board.
How Do You Preserve Board Decks?
To preserve decks, start by regularly cleaning and inspecting the boards for any signs of wear or damage. If the graphics on the decks are fading or peeling, you can use art or paint to touch up the design and keep it looking fresh. Replace the grip tape as needed, and be mindful of any holes or cracks in the decks, as they can compromise the integrity. Regular maintenance and care will help extend the lifespan of the decks and ensure a smoother and safer ride.
What Sandpaper Is Best For Decks?
The best sandpaper for board surfaces depends on your specific project needs. Coarse grit (36-60) is great for heavy-duty tasks, medium grit (80-120) for general sanding, fine grit (150-220) for surface preparation, and extra fine grit (240 and higher) for fine finishing. Choose the appropriate grit or sequence of grits based on your deck’s condition and the refinishing tasks ahead.
Last Updated on July 1, 2024 by Harold Chan
DISCLAIMER (IMPORTANT): This information (including all text, images, audio, or other formats on FamilyHype.com) is not intended to be a substitute for informed professional advice, diagnosis, endorsement or treatment. You should not take any action or avoid taking action without consulting a qualified professional. Always seek the advice of your physician or other qualified health provider with any questions about medical conditions. Do not disregard professional medical advice or delay seeking advice or treatment because of something you have read here a FamilyHype.com.